As professional photographers, we need to balance how we spend our time. While we should dedicate a large portion of our time to perfecting our craft, we also have to strike a balance with everything else that goes into running a photography business.
Editing photos after a shoot is one of those tasks that can take up a huge amount of time, and rightly so. After all, it determines the quality of the finished product that we deliver to our clients, and we should strive to do a good job. That said, it’s also a task with diminishing returns. Beyond a certain point, spending even more time obsessing over every pixel isn’t going to make a difference to our clients, and we’re better off spending our time elsewhere—like marketing our photography business.
That’s where batch editing comes in, to speed up our editing workflow. Batch editing means that we edit multiple photos at once, and it can cut down your editing time by more than half once you get the hang of it. Another productivity hack is to use the right Lightroom plugins to speed up your workflow.
Batch editing is especially relevant when you expect a large volume of photos, making it impractical to edit photos one by one. Hence, it’s commonly used for editing weddings, events and high volume shoots such as graduation portraits or marathon photography.
These types of shoots typically require a fast turnaround time. We’ve edited events where the clients needed the edited photos within a couple of days, on top of a small selection of photos delivered on the day of the event itself—usually for social media or press releases. And if you’re doing graduation portraits with the goal of selling the photos, you’d want to deliver the photos as quickly as possible—because the faster you deliver, the more photos you sell.
In addition, these types of events generally don’t require extensive retouching, except for perhaps a select few photos—such as a close-up couple portrait for a wedding. Since photos are adjusted with global edits (which are applied to the whole photo) instead of local adjustments (which are applied to parts of the photo), they are particularly well suited for batch editing.
The Basics of Batch Editing
When you batch edit, you generally want to separate your shoot into segments, and batch edit by segment.
Here’s an example to illustrate what I mean.
Let’s say you just shot a full wedding day. The wedding day is usually broken up into different segments, and each segment takes place at a different venue—usually outdoors during the day and indoors at night. You want to edit the photos from the same segment consistently, because they are taken in similar lighting conditions. Hence, applying the same batch edit gives you a great starting point.
On the other hand, photos from different segments can vary significantly in their lighting conditions. That means you’re applying different exposure and temperature adjustments (among others), and the edits from one segment will not look good for another segment.
In addition, remember that batch editing can take you 80% of the way, but not 100%. After I apply the batch edits, I always run through the photos one by one to make minor adjustments. Regardless of how consistently you can shoot and control your lighting, there will always be minor variations that you need to account for.
Now that you understand the basics of batch editing, let’s cover how to batch edit in Lightroom. While there are many viable alternatives to Lightroom, it’s still the most widely used photo editing software by photographers. In this article, we’ll walk through batch editing in Lightroom and Lightroom Classic, which have slightly different workflows.
How To Batch Edit in Lightroom
There are two ways to batch edit in Lightroom—copy and paste your edits from a photo to another, or apply a preset.
Copy and Paste Edits
First, start by editing a single photo. Then, you can copy and paste the edit to other photos.
Click on Copy Edit Settings at the bottom of the screen or hit Command+C (on Mac) or Ctrl+C (on Windows) to copy all the edit settings.

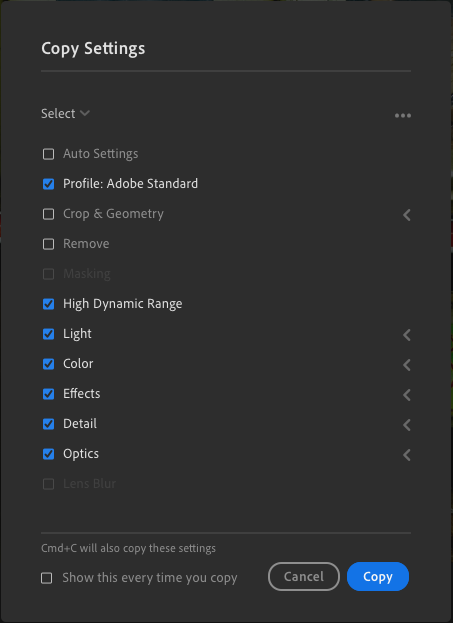
Alternatively, you can select the specific edit settings to copy, instead of copying all of them. For example, you might want to copy the exposure and temperature adjustments, but not the sharpening. To do this, click on the gear icon beside Copy Edit Settings or hit Command+Shift+C (on Mac) or Ctrl+Shift+C (on Windows). This will bring up a dialog where you can select the settings to copy.
Next, select the photos to paste the edit settings to. Then, click on Paste Edit Settings or hit Command+V (on Mac) or Ctrl+V (on Windows).
Apply a Preset
In Lightroom, presets are pre-defined settings that apply specific adjustments to your photos. You can create presets with your own editing style, use the built-in presets in Lightroom or purchase presets from the many companies and photographers that offer them.
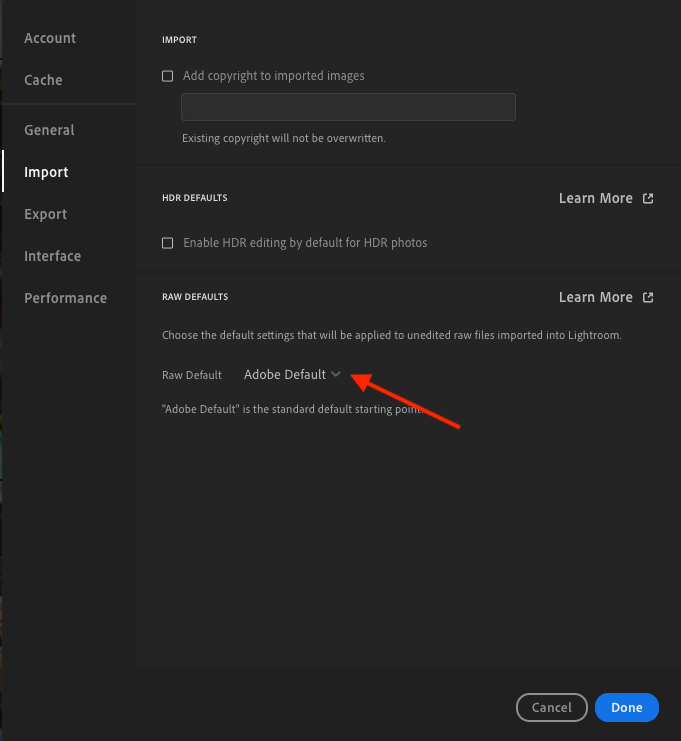
You can apply a preset when you import your photos into Lightroom. To do this, go to Preferences, then Import. Under Raw Defaults, you can choose the preset that will be automatically applied to imported photos.
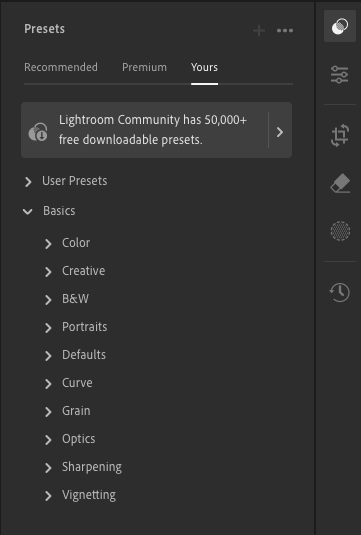
Alternatively, you can apply presets to photos that are already in Lightroom. To do that, open the Presets panel. Then, select the photos and click on the preset to apply it.
How To Batch Edit in Lightroom Classic
There are three ways to batch edit in Lightroom—make adjustments in the Quick Develop panel, copy and paste your edits from a photo to another, or apply a preset.
Edit in Quick Develop
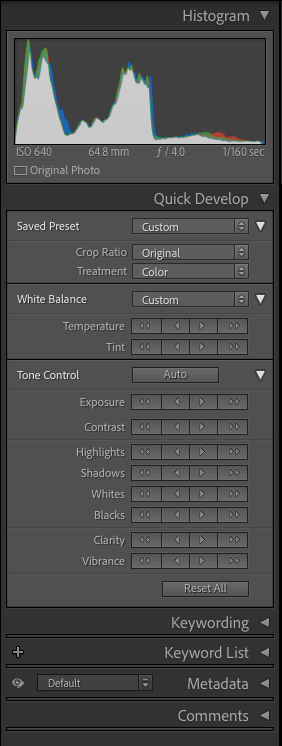
In my opinion, Lightroom Classic is superior to Lightroom for batch editing because of the Quick Develop panel in the Library module, which lets you make adjustments to multiple photos.
In Library mode, select the photos you want to edit. Then, use the Quick Develop panel to make your edits. It allows you to make many of the global adjustments you would want to make in batch editing, such as exposure, temperature and contrast.
I usually do this after I apply my presets, for a quick round of adjustments to multiple photos at once. The great thing about this mode is that I can view my photos in a grid while editing, which helps me keep my adjustments consistent across photos. For example, if I’m going with a warm tone, I can check that I’m getting a similar warm tone across all of my photos, at a glance.
Copy and Paste Edits
First, start by editing a single photo in the Develop module.
After you’re done, select the other photos you want to paste the edits to. Lightroom Classic will designate the first photo as the one to copy edits from.
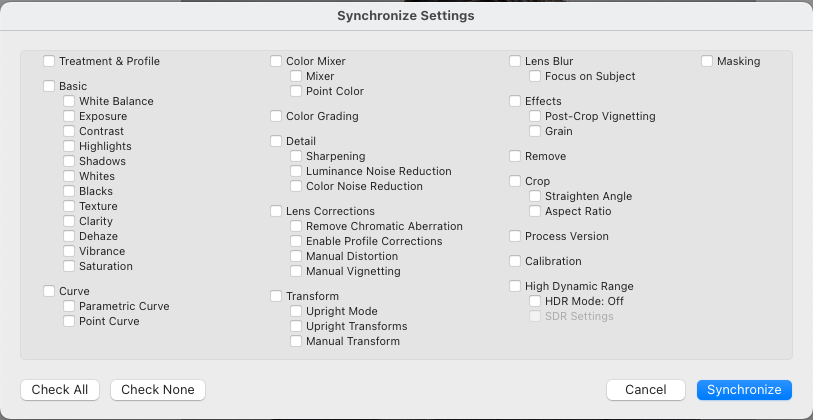
Click on Sync at the bottom of the right panel, or hit Command+Shift+S (on Mac) or Ctrl+Shift+S (on Windows). This will bring up a dialog where you can select the settings to copy. Once you’re done, click on Synchronize.
Apply a Preset
Just like Lightroom, you can also apply presets in Lightroom Classic.
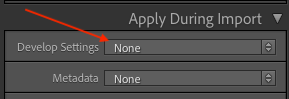
You can apply a preset when you import your photos into Lightroom. In the Library module, click the Import button. Then, open the Apply During Import panel on the right side of the Import window. Under Develop Settings, select a preset from the list and it will be applied to all of the photos that you import.
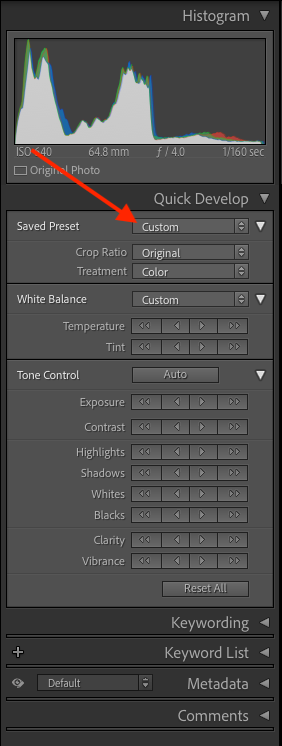
Alternatively, you can apply presets to photos that are already in Lightroom Classic. In the Library module, select the photos that you want to apply the preset to. Then, click on the dropdown beside Saved Preset in the Quick Develop panel, and select the preset to apply.
AI Photo Editors
Since the whole point of batch editing in Lightroom is to speed up our workflow, it makes sense to explore AI photo editors to further improve our efficiency. There are several options that provide AI culling and batch editing, such as Imagen, Aftershoot and Narrative.
I’m a big fan of AI photo editors because they help to save so much time, not just in editing but also in culling. When it comes to events, weddings and high volume shoots, we often shoot in bursts to be safe and make sure that we don’t miss out on any important moments. But that puts the burden on the culling process, where we have to choose the best option out of 10 to 20 very similar looking photos. AI photo editors can help us group those duplicates and select the best option by checking for out-of-focus shots or closed eyes. This significantly speeds up the culling process.
AI photo editors can also help us to batch edit by applying AI profiles, which you can think of as better versions of presets. The problem with presets is that they aren’t smart at all—all they do is apply the same settings regardless of the photo. AI profiles are smarter because they analyze the photos and apply the edits accordingly, just like what a human editor would do.
Just like bulk editing in Lightroom, AI photo editors won’t get you 100% of the way. That said, they get you closer than any other automated workflow, which is a win in my book.
If you’re interested in exploring AI photo editors, you can read our article about the 10 best AI photo editors for photographers.
Conclusion
As photographers, we have to balance the time we spend editing our photos with everything else that goes into running a successful photography business. Bulk editing our photos in Lightroom can help us to do it efficiently, getting us to a good starting point for more extensive editing.
I believe that having a quick turnaround time is a significant competitive advantage. There is a time value to photos, especially for events, weddings and high volume photography. You want to be able to deliver quickly, to keep your clients coming back. Learning how to batch edit in Lightroom, and keeping up to date with the latest AI photo editors, will help you stay ahead of the competition.