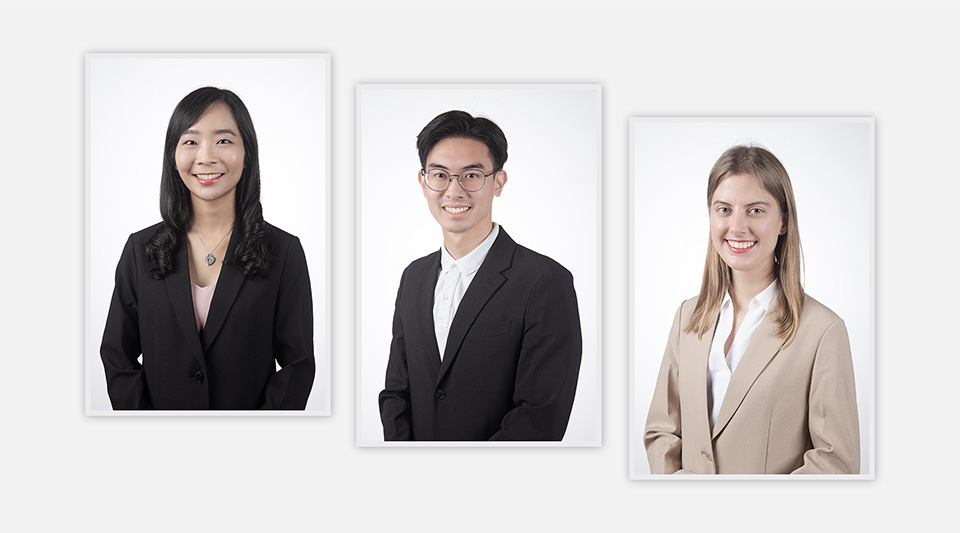
Over the past few years, I’ve run mobile headshot and portrait setups for everyone from LinkedIn and Uniqlo to conferences, roadshows, and public brand activations. These are fast-moving environments with high foot traffic and tight turnaround times, where the setup has to work reliably, every single time.
Depending on the context, this kind of setup goes by different names. At conferences and trade shows, it’s often called a headshot booth or headshot lounge, designed to produce clean, professional headshots quickly—and just as importantly, to attract foot traffic. At weddings and private events, you’ll hear terms like portrait station, portrait studio, or portrait booth, where the emphasis shifts toward experience and keepsakes.
The underlying idea is the same: a portable portrait setup that brings the studio to where people already are.
This guide is written for photographers who are considering offering this as a service. I’ll start by breaking down the business side of headshot booths, including how they make money, when they’re worth doing, and when they’re not. Then I’ll cover how to set one up in a way that’s portable, reliable, and scalable across different types of events.
The Business Model Behind Headshot Booths

I’ve been offering headshot booths since 2022 and generate five-figure annual revenue from them, with that number growing year over year. More importantly, I’ve seen very clearly what makes this service profitable, and what turns it into a time sink.
At a high level, headshot booths operate under two different business models, each with its own incentives and risks. Choosing the right one has a bigger impact on outcomes than the equipment you use or the type of event you shoot. It directly shapes pricing decisions and determines whether this service becomes a sustainable source of revenue or a short-term experiment.
Business Model 1: Client-Paid
This is the more predictable and sustainable model.
In this model, a client hires you to run a headshot booth as part of an event or internal initiative. The value is not just the portraits themselves, but the logistical simplicity and operational reliability you provide.
I typically see two categories of client-paid work.
Event and brand activations
Live events such as conferences, trade shows, and in-store activations are one of the most common entry points for headshot booths. Companies use them to support a larger objective, such as lead engagement, brand visibility, or customer experience.
In these environments, portraits function as an engagement tool. They attract attention, give attendees a tangible takeaway, and extend the value of the event beyond the moment itself. From the client’s perspective, they are paying for speed, reliability, and the ability to handle high foot traffic without disruption.
Client-paid events are stable because the revenue is agreed upfront. Once booked, your risks are operational rather than financial.
Company-wide portraits
The second category is internal company shoots, where the goal is to produce consistent headshots across a large team. This is common for organizations updating their website, blog, or marketing materials.
When the company has more than a handful of employees, bringing a mobile portrait studio on-site is often the most practical option. Employees can step away briefly, get photographed, and return to work without having to coordinate dozens or hundreds of individual studio appointments.
Here, the value lies in efficiency and coordination at scale.
Business Model 2: Guest-Paid
Guest-paid setups are more flexible, but also more unpredictable.
In this model, the event organizer provides space, and you generate revenue by selling digital photos or prints directly to attendees. This can work well, but only under the right conditions.
Guest-paid pop-up studios perform best when:
- The audience already expects portraits or keepsakes
- The event creates emotional or practical urgency
- Foot traffic is consistent throughout the day
School graduations and sports events are good examples. Attendees already value the outcome, and purchasing decisions happen naturally.
Where this model breaks down is at low-intent events. If guests see portraits as a novelty rather than a need, conversion rates drop quickly. Your revenue is dependent on event type, timing, and presentation.
For this reason, I generally treat guest-paid setups as a way to fill quieter periods, test new markets, or create follow-on opportunities rather than as a core business model.
How to Set Up a Headshot Booth

Because a headshot booth operates on-site, the setup needs to be simple and portable. I usually work with two or three portable studio lights, prioritizing a setup that performs reliably in tight spaces and can be set up quickly.
When planning a headshot booth, these constraints matter most.
- Portability
All equipment needs to be easy to transport and quick to deploy. Everything should fit into the back seat or boot of a car. - Ease of setup
At live events, setup time is part of the cost. Quick-folding softboxes and pop-up backdrops reduce setup time and make it easier to stay on schedule. - Space
Think about the physical footprint of the portrait booth and make it as small as possible. Often, you’ll have no control over the space that you’re given, and I’ve worked in exhibition booths that are as small as 3m by 3m. - Power
Access to power is never guaranteed. I prioritize lighting that can run on batteries as well as plug into an outlet. Being able to operate fully on battery power removes a major source of uncertainty and allows the headshot booth to work anywhere.
An Example Setup from a Live Event
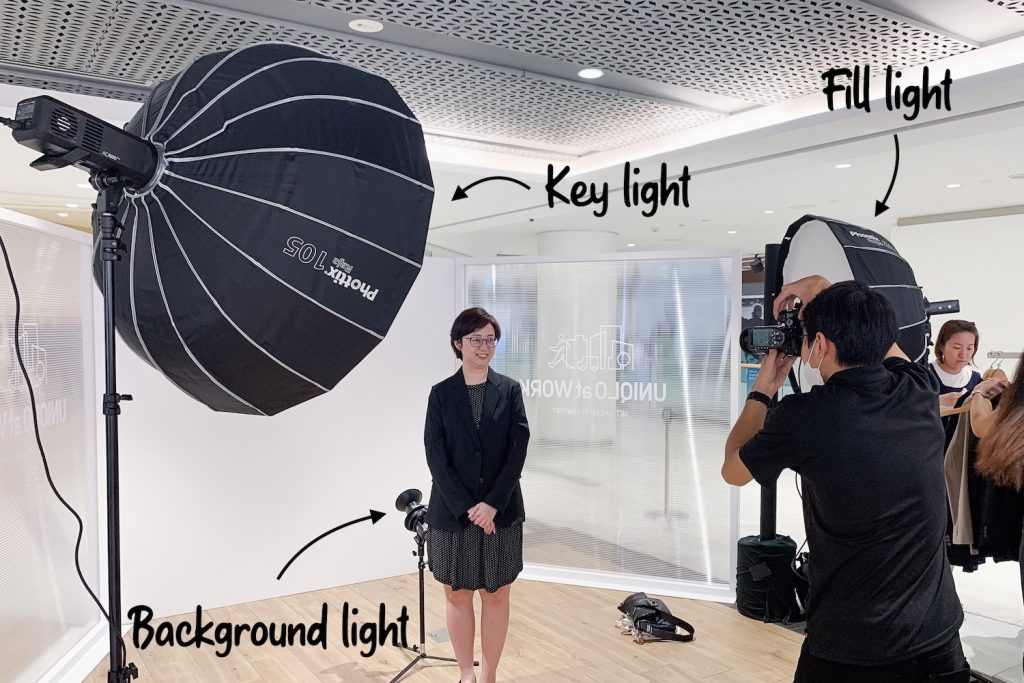
For a Uniqlo roadshow, I used a three-light setup.
At the front, I placed a key light and a fill light at roughly 45-degree angles to the subject. The fill light was adjusted to lighten up the shadows without flattening the face.
For the key light, I used a Phottix Raja quick-folding softbox (105 cm) with a Godox AD600Pro. For the fill light, I used a Phottix Raja quick-folding softbox (65 cm) with a Godox AD200Pro.
I added a third light aimed at the white backdrop to achieve a light gray background. Because the portraits were framed from the waist up, I could position this light directly behind the subject at knee height.
With a setup like this, I can reliably get the headshot booth up and running in about 30 minutes.
If you want to push this further and achieve a pure white background, I’ve covered the setup and lighting approach in detail in my article on creating white background portraits.
I’m not going into portrait lighting theory here, as it’s a topic in its own right. What matters for headshot booths is repeatability. Once you understand the logic of light placement, the same approach works across different events. If you want to see how shadow can be used intentionally to sculpt faces, I break this down in my guide to Rembrandt lighting.
The Key Elements of a Headshot Booth Experience
A reliable setup is table stakes. The experience of your headshot booth is what wins deals and supports higher pricing.
That experience comes down to the viewing station, instant sharing, and on-site printing. These elements shape how clients judge value, how guests engage with the shoot, and how efficiently revenue is captured during live events.
The Viewing Station: Why It Matters
At every live shoot, I set up a viewing station so guests can see their portraits immediately. It serves three important functions.
- Increase engagement
It elevates the live photoshoot experience. When people see portraits of themselves on a screen, conversations start and energy builds around the shoot. I’ve had shoots where people gathered around the screen to watch images come in, reacting and talking about the photos together. What could have been a transactional moment turns into a shared experience. - Speed up decision making
The viewing station allows guests to choose which photos will be edited. For most company shoots, portraits are edited before delivery, and this step gives guests a sense of control. When people make the selection themselves, it reduces back-and-forth later. You end up editing only the images they’ve already committed to. - Enables immediate delivery
Once a guest has selected their images, sharing and printing become straightforward. There is no ambiguity about what needs to be delivered.
How I Set Up a Viewing Station
I usually run the viewing station on a tablet or laptop. For internal company shoots where privacy is not a concern, I’ve also used a live slideshow on a TV screen.
Using Honcho, photos upload from camera to cloud as I shoot. The album can be opened in a browser on any device, which becomes the viewing station. Presets can be applied immediately, or an assistant can edit the images in parallel using the collaborative editor.
This makes it possible to deliver finished portraits in seconds rather than days.
If you want a fuller walkthrough of cloud upload in real workflows, check out my guide to camera-to-cloud workflows for photographers.
If you don’t want to use Honcho, you can tether to a laptop instead. The trade-off is that live viewing, sharing, and printing become harder to manage. I break down these tethering approaches in more detail in my tethered photography guide.
Instant Sharing: Why It Matters
Real-time photo delivery is not a convenience feature, but a requirement for public events. It’s part of a broader photography workflow designed for fast delivery, where photos move quickly from capture to sharing.
There are three reasons this matters.
- Photos have a time value
Photos are most valuable when guests are still excited to receive them. That moment is usually right after the portrait is taken. If delivery is delayed by days or weeks, much of that excitement is lost. - Public events limit follow-up
At conferences and roadshows, you often don’t have permission to collect personal contact information. If you can’t reach guests later, the only viable delivery window is on-site. - Manual delivery does not scale
Even when contact details are available, sending portraits individually after the event is time-consuming and prone to mistakes. Clients rarely want to manage this, which means it falls back on you. Instant sharing shifts all of that work into the live shoot, where it can be completed once and correctly.
The same principle applies in roaming photography, where the goal is to capture and deliver moments across the venue in real time rather than from a fixed setup. I’ve written more about how that works in my guide to roaming photography.
With Honcho, I typically use one of two methods, depending on the event.
- Face recognition
Guests scan a QR code to access the gallery, then use a selfie to automatically find their portraits with face recognition. This works well for high-volume events, where a self-service flow reduces workload. - QR code galleries
For smaller events, I share images via a QR code that opens a gallery containing only the selected photos.
In both cases, I’m essentially creating a shareable gallery link that guests can open immediately. This removes the need for manual follow-up and completes delivery while engagement is still high.
On-Site Printing: Why It Matters
On-site printing gives guests a physical takeaway while they’re still at the event.
For some clients, prints are part of the experience. They want something guests can hold and take home. In guest-paid setups, prints can also be sold directly on the spot, without any follow-up after the event.
Printing during the shoot avoids extra work later. There’s no need to manage orders, chase payments, or ship prints after the fact. Everything is completed while the guest is still present.
How I Print On-Site
I handle live printing with Honcho using a simple wireless setup.
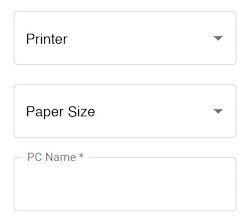
First, I install the CloudPrint app on a laptop (available with Honcho) and connect the printer. In CloudPrint, I select the printer and paper size, then give the printer a name so it’s easy to find later.
Once the printer is connected, it shows up inside Honcho.
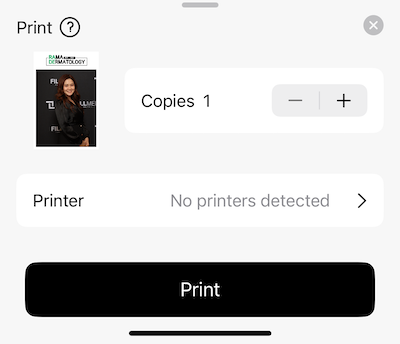
From the Honcho mobile app or website, I select the photo to print, tap the Print icon, choose the printer, and send the job. That’s it.
Because printing is wireless, it doesn’t matter which device I’m using. I can send prints from my phone, tablet, or laptop. If I’m working with an assistant, they can manage printing from the laptop while I continue shooting. If I’m working alone, I can handle it myself from the mobile app.
Either way, printing happens during the shoot and doesn’t create extra work afterward.
Conclusion
A headshot booth can be a useful addition to a photography business and offers a practical way to diversify income.
If you’re considering offering this service, start by being clear about the business model you’re operating under. Decide whether you’re optimizing for predictable, client-paid work or more flexible but less consistent guest-paid setups. Most importantly, treat experience and delivery as part of the product, not extras.
Frequently Asked Questions
Yes, as long as the setup and workflow stay simple. A headshot booth can work well for solo photographers because everything happens in one place and during the event. It becomes difficult when the setup is too complex or when photos are delivered after the event, which creates extra work. If you’re working alone, focus on setups that are quick to run and finish on-site.
This depends more on workflow than on shooting speed. In a well-run headshot booth, photographing about 15 to 25 people per hour is realistic for individual headshots. Numbers drop if posing takes too long or if photo selection and delivery are handled inefficiently.
No. Most headshot booths run in smaller spaces than expected. I’ve worked in booths as small as 3m by 3m. What matters is whether your setup is designed for tight spaces, using simple lighting and controlled framing.
It can, but it’s much harder at public events. Without instant delivery, interest drops and follow-up work increases. In many cases, you also can’t deliver at all if you don’t have permission to collect contact details. Delayed delivery may be fine for internal company shoots, but for public events instant delivery is often necessary.
Client-paid headshot booths are more reliable because payment is agreed upfront. Guest-paid setups can work, but results depend heavily on the type of event and the audience. Because of this, guest-paid work is better treated as an extra option rather than guaranteed income.