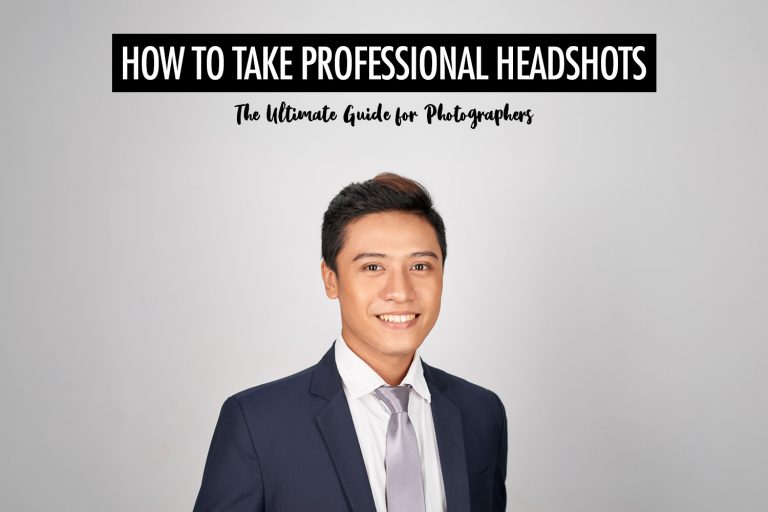
Part of our Creativity guides
Explore more ideas, inspiration, and visual techniques in our Creativity section.
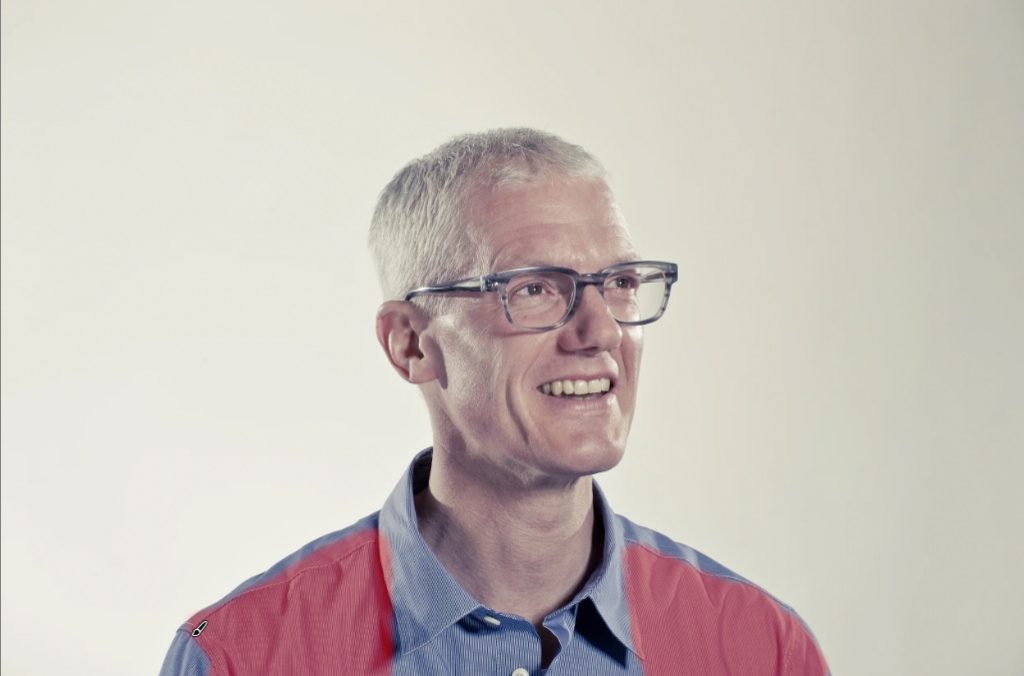
You capture what feels like a perfect photo, only to notice strange wavy patterns later in editing. They might appear on a suit, a dress, or a building facade, even though nothing like that was visible in real life. This issue is called the moiré effect (pronounced “more-ay”), and it is something every photographer runs into sooner or later.
Moiré is not a fabric problem. It happens when fine, repeating details clash with how a camera sensor records them. What makes it frustrating is that it often shows up only after the shoot, when your options are limited and fixes become time-consuming.
Understanding what moiré is helps, but it is not enough. In real shoots, you have to decide when to prevent it, when to work around it, and when to accept small compromises to protect the final image. What separates experienced photographers from beginners is not avoiding moiré entirely, but knowing which compromises are acceptable in each situation.
This article focuses not just on what causes moiré, but on how photographers make those decisions in practice. You will learn where moiré is most likely to appear, how to spot it early, and how to choose the least damaging fix depending on the situation.
Why Moiré Happens: A Closer Look
In this section, we’ll explore the science behind the moiré effect. If you’re not interested and just want practical tips, skip to the next section.
To understand why the moiré effect appears, it helps to start with how a camera sensor sees the world. At the heart of every digital camera is a grid made up of millions of tiny light-sensitive pixels, or photosites. Each one captures light intensity and color information at a fixed interval, like a mesh net catching light waves.
This grid structure determines how finely the sensor can resolve detail, often referred to as its sampling frequency. When your subject features repeating patterns that are finer than this sampling frequency, the sensor struggles to record them accurately.
This is where interference comes into play. When the repeating pattern of the subject (for example, the weave of a suit fabric or the fine lines of architectural tiles) interacts with the pixel grid, it can create false overlapping patterns that don’t exist in real life.
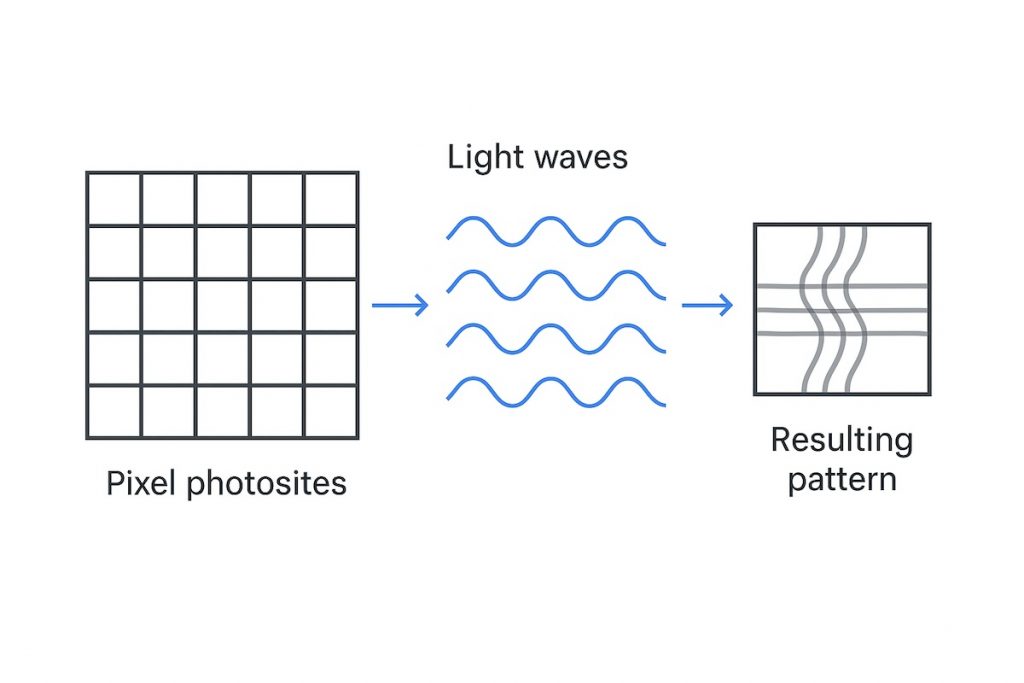
Think of it like two transparent grids laid on top of each other but slightly misaligned. You start to see wavy, swirling lines where the two grids intersect. These lines are the visual manifestation of aliasing, a phenomenon that occurs when a sensor misrepresents detail that exceeds its resolving capability.
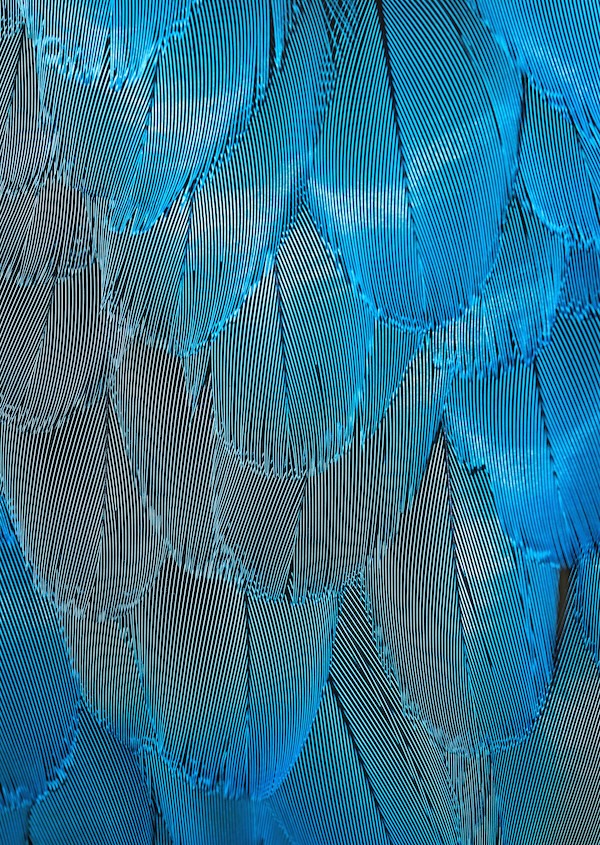
The moiré effect is essentially aliasing made visible. Instead of recording the original pattern cleanly, the camera produces a distorted overlay, often in the form of rippling lines or rainbow-like color shifts, that moves or changes as you zoom or resize the image. The effect is particularly noticeable in areas of the frame with consistent, tight detail, such as fabric textures.
Different cameras have different strategies for dealing with moiré. Many DSLRs and some mirrorless models use optical low-pass filters, commonly known as anti-aliasing (AA) filters, which sit directly in front of the sensor. These filters work by introducing a very slight blur at the pixel level, diffusing ultra-fine detail just enough to prevent the interference patterns from forming in the first place. While this reduces the risk of moiré, it can also soften overall image sharpness slightly, which is why manufacturers carefully balance the strength of these filters.
On the other hand, some modern high-resolution cameras, particularly mirrorless models, omit AA filters entirely. With more megapixels and smaller pixels, these sensors can resolve finer detail, making moiré patterns less likely in many shooting situations.
However, the absence of an AA filter means that when moiré does occur, it may appear more pronounced and require careful attention in post-processing.
Medium format cameras face similar trade-offs. Their incredible resolution can help avoid the moiré effect in some scenarios, but finely patterned subjects can still trigger it under the right conditions.
Situations Where Moiré Is Most Likely
Moiré does not appear randomly. It tends to show up in predictable situations, usually when fine, repeating details interact poorly with the camera sensor. Knowing where it is most likely to occur makes it easier to spot early and deal with it before it becomes a problem.
Tightly Patterned Fabrics
Clothing is one of the most common triggers. Suits, dresses, ties, and shirts with fine stripes, checks, or woven textures can easily produce moiré, especially when the pattern fills a large part of the frame.
This is most noticeable in portraits, weddings, fashion shoots, and corporate photography, where fabric detail is often sharp and central to the image.
Architecture With Repeating Lines
Buildings with window grids, railings, tiles, or brickwork can also cause moiré. The effect becomes more likely when the pattern is uniform and evenly spaced across the frame.
Architectural shots taken straight on, with little perspective change, are particularly prone to this because the repeating lines align more closely with the sensor.
Screens and Digital Displays
Computer monitors, LED walls, TVs, and projection screens are frequent sources of moiré. These surfaces already contain pixel grids, which can clash with the camera sensor and create strong interference patterns.
This is common in conferences, live events, stage photography, and presentations.
High-Resolution Cameras Without AA Filters
Cameras without anti-aliasing filters are generally sharper, but they can be more sensitive to moiré when it does appear. Fine detail that looks clean at first glance can reveal interference once you zoom in or review the image on a larger screen.
This does not mean these cameras are worse. It simply means moiré requires more attention when shooting certain subjects.
Long Distances With Fine Detail
Moiré is more likely when fine patterns are photographed from a distance. As the subject becomes smaller relative to the sensor, repeating details can fall below the sensor’s ability to record them cleanly.
This often happens in event photography, crowd shots, and wide architectural scenes.
How to Prevent Moiré When Shooting (Decision-Driven Guidance)
Moiré is rarely eliminated without compromise. In practice, preventing it means deciding which imperfection you are willing to accept in exchange for another. Sharpness, depth of field, framing, distance, and texture fidelity are all competing priorities, and experienced photographers manage moiré by choosing the least damaging trade-off for the job at hand.
The goal is not to avoid moiré at all costs, but to recognise when it is likely to appear and intervene in the least destructive way.
Anti-Aliasing Filters: When Softening Is Acceptable and When It Is Not
Anti-aliasing (AA) filters help reduce moiré by slightly softening very fine details before the image is recorded. This can prevent interference patterns, but it also makes the image a little less crisp overall.
AA filters tend to work well when:
- the subject includes tight patterns like suits, dresses, screens, or synthetic fabrics
- avoiding visible moiré is more important than showing fine texture
- the images will be viewed at normal sizes or delivered quickly
They can cause problems when:
- fine texture and detail are a key part of the image
- the subject includes foliage, stone, brick, or architectural surfaces
- the final image needs to be as sharp as possible
In practice, this trade-off shows up most clearly in fashion and corporate work. During shoots with finely patterned suits or dresses, moiré can appear immediately when reviewing test shots. Adjusting distance may reduce it slightly, but at tighter framings the pattern often remains. In these situations, photographers often choose the option that creates the least visible distraction. Accepting slightly softer fabric detail is usually preferable to delivering images with obvious rippling patterns across clothing.
That is why fashion and corporate photographers are often comfortable using AA filters or other forms of controlled softening. Moiré on clothing draws attention and is difficult to fix cleanly later. Landscape and architectural photographers, on the other hand, usually avoid AA filters because softened textures can make buildings, rocks, or natural surfaces look flat and lifeless.
The real choice is not whether AA filters are good or bad. It is whether slightly softer detail is less noticeable than visible moiré in the finished image.
Distance: The Lowest-Cost Intervention When You Have Physical Freedom
Changing shooting distance is often the cleanest way to eliminate moiré because it does not inherently degrade image quality. By altering how a repeating pattern projects onto the sensor, small distance shifts can break the alignment that causes interference.
This approach works best when:
- you are free to move without compromising composition
- the subject is not tightly framed
- the pattern exists on clothing or secondary elements
It breaks down when:
- the composition is fixed
- the environment is constrained
- the subject scale is critical to the image
In real shoots, this often comes up with clothing. For example, when photographing a groom in a pinstripe suit, faint moiré may appear at one distance but disappear when you take a small step forward or back. When there is room to adjust, this fix costs nothing and preserves sharpness.
However, distance stops being a free solution when it starts to affect framing. Moving closer might crop out important context or exaggerate proportions. Moving back might weaken the subject’s presence in the frame. At that point, you have to decide whether a cleaner pattern is worth the compositional change.
Distance adjustments work best when they remove moiré without creating a new problem. If so, they are usually the first option experienced photographers try.
Aperture: Choosing Between Depth, Sharpness, and Moiré Risk
Aperture affects moiré by controlling how sharp fine details appear in the image.
Wider apertures help when:
- the problematic pattern is not the primary subject
- background textures are triggering interference
- depth of field can be sacrificed without harming the image
Be cautious about stopping down when:
- patterned surfaces cover large areas of the image
- you are aiming for sharpness from edge to edge
- texture and surface detail matter to the final result
This often comes up in architectural or event photography. For example, when photographing a speaker in front of a building facade or a tiled wall, stopping down to keep the entire scene sharp can cause moiré to appear in the background pattern. Opening the aperture slightly can soften those repeating lines just enough to reduce interference, even though it means the background is no longer perfectly sharp.
This is where instinct can work against you. Stopping down feels safer because it increases sharpness, but in moiré-prone scenes, that extra clarity can make the problem worse rather than better.
The real decision is not which aperture avoids moiré completely. It is whether slightly softer background detail is a better trade-off than visible distortion that draws attention away from the subject.
Focal Length and Framing: Fixing Moiré Without Losing Sharpness
Changing your focal length can sometimes remove moiré without softening the image. Even small zoom adjustments can change how patterns are recorded by the camera and make interference disappear.
This works best when:
- you need to keep the image sharp
- small changes in framing are acceptable
- reframing does not change the meaning of the photo
It becomes less effective when:
- the composition is carefully planned and cannot change
- changing perspective affects how the image feels or reads
- straight lines, symmetry, or proportions need to stay exact
This often comes up in architectural or urban photography. For example, a photographer shooting a building facade may notice moiré appearing across repeating window grids at a certain focal length. Zooming in slightly can remove the interference without reducing sharpness. However, that same adjustment may crop out architectural context or disrupt symmetry that was central to the composition.
At that point, the decision is no longer technical. It becomes a choice between preserving the original framing or removing a visible distortion that draws attention away from the subject.
Experienced photographers treat focal length changes as a precision tool. They use them deliberately, only when the fix does not undermine the image they are trying to make.
Test Shots: Finding the Easiest Fix Early
Test shots are not just for checking exposure or focus. They help you spot moiré early and fix it while your options are still open.
Taking a quick test frame lets you check a few important things:
- Is moiré showing up at all?
- Which part of the image is causing it?
- Does stepping closer or farther away make it disappear?
- Does changing aperture help without hurting depth of field?
- Can a small framing change solve the problem without changing the image’s meaning?
This process turns moiré from a surprise into something you can manage on purpose.
For example, imagine photographing a speaker on stage in front of a large LED screen. A quick test shot reveals faint wave patterns in the background. Stepping slightly to one side reduces the effect, but does not remove it completely. Opening the aperture softens the screen just enough while keeping the speaker sharp. Because this was caught early, you can lock in those settings before the presentation begins.
Photographers who skip test shots often discover moiré only after the shoot, when every solution involves heavy editing or compromises they no longer control.
The Core Decision Rule
Preventing moiré is not about using every possible fix. It is about making the smallest change needed to solve the problem without damaging the image.
When moiré appears, work through these questions in order:
- Can I change my distance without hurting the composition?
- Can I reframe or adjust focal length without changing the intent of the image?
- Can I reduce sharpness slightly using aperture without losing clarity on the subject?
Only if none of these work should you accept overall softness or rely on heavy editing later.
Photographers who handle moiré well do not try to eliminate it at all costs. They fix it carefully, choosing the least disruptive solution each time.
How to Fix Moiré in Post-Processing
Even with the best preparation, the moiré effect has a way of slipping through. A subject may arrive in a finely patterned outfit you didn’t anticipate, or the interference may not be visible on the camera’s preview screen and only become obvious once the files are reviewed more closely. It happens to everyone.
Post-processing should be treated as a fallback, not a primary solution. Every correction applied after the shoot comes with trade-offs, usually in texture or fine detail. The goal is not to remove moiré perfectly, but to reduce it enough that it no longer draws attention or competes with the subject.
Two of the most effective approaches involve using Lightroom’s built-in tools for targeted corrections and, when necessary, AI-powered retouching software to handle larger or more complex areas efficiently.
Fixing Moiré in Lightroom
Lightroom comes with a dedicated brush tool designed to reduce moiré, making it a reliable first step when you spot unwanted patterns during editing. Start by importing your photos, then select the Adjustment Brush tool (or Masking tool in newer versions) by pressing “K” on your keyboard.
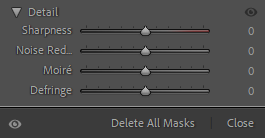
Paint over the affected area. In many cases, this might be a shirt, suit, or fabric with fine patterns. Once you’ve covered the problem zone, locate the moiré slider in the Detail tab. Subtle moiré usually fades with a small adjustment, but more stubborn interference may require extra fine-tuning to fully disappear.
For even cleaner results, try combining moiré reduction with slight adjustments to Sharpness and Defringe. This helps maintain the fabric’s natural look while avoiding an overly soft or “blurred out” texture.
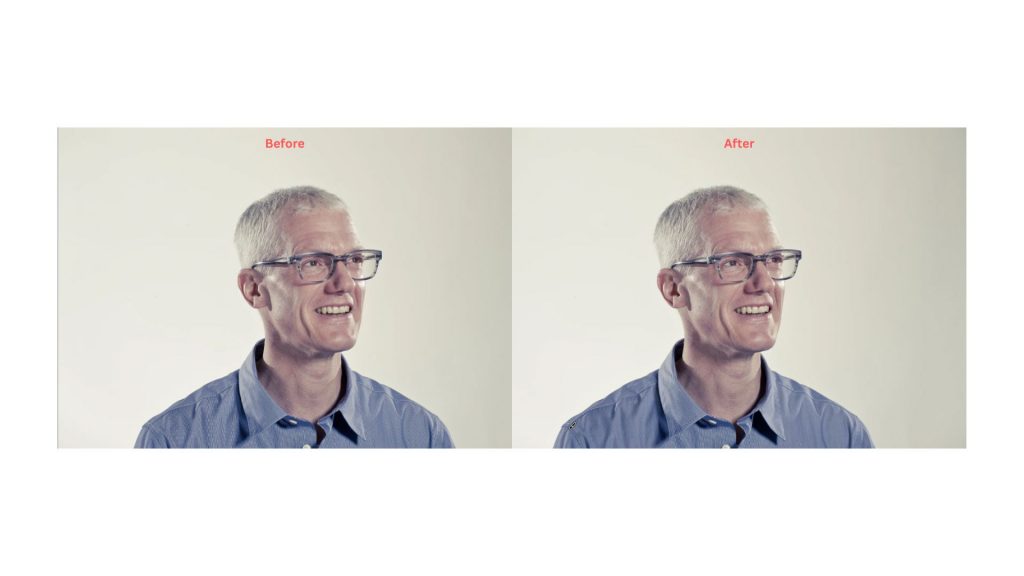
Take your time with this step. Brushing too broadly or applying extreme values can flatten details in areas that don’t actually need correction. A careful approach ensures you fix the moiré without compromising the overall quality of the image.
Using AI Retouching Tools
Sometimes, Lightroom alone isn’t enough. This usually happens when moiré affects large areas of an image, appears consistently across many frames, or is deeply embedded in fine textures like fabric or screens. At that point, the challenge is less about precision and more about time and consistency.
This is where AI-powered retouching tools can help, particularly in high-volume workflows.
For example, on a fashion or commercial shoot where a patterned jacket triggers moiré across dozens of images, fixing each frame manually in Lightroom can become slow and inconsistent. Tools like Retouch4me Fabric are designed specifically for this scenario. They analyse fabric textures, identify interference patterns, and apply automated corrections that remove the most distracting moiré while attempting to reconstruct underlying detail. Used carefully, this can save hours of repetitive work.
Luminar Neo approaches the problem differently. Its AI-powered local adjustments allow you to target affected areas without applying global softening. This makes it useful when moiré appears in backgrounds, screens, or architectural surfaces, and you want to reduce interference without dulling the rest of the image.
Other tools handle moiré more indirectly. Topaz Photo AI, for example, does not offer a dedicated moiré control, but its artifact suppression and detail management can reduce subtle interference patterns as a side effect. Similarly, ON1 Photo RAW includes localized noise and pattern reduction tools that some photographers use to suppress moiré in specific regions.
The trade-off is always the same. Automated corrections tend to smooth texture if applied too broadly. This is why control matters more than speed.
A practical workflow is to apply AI corrections on a duplicate layer or version, then mask them selectively onto the affected areas. This keeps the benefits of automation while preserving detail elsewhere in the image. Applying AI tools globally often replaces moiré with a different problem: flat or unnatural texture.
AI retouching works best when the goal is to reduce obvious distortion quickly, not to perfectly restore fine detail. When used with restraint, these tools can be extremely effective. When used indiscriminately, they simply hide one artefact by introducing another.
Quick Reference: Moiré Troubleshooting Checklist
Start with changes that preserve image quality, such as distance, framing, or focal length. Only introduce softening or post-processing when those options no longer work.
Preventing moiré:
- Zoom in on the LCD: Always check fine details at 100% magnification during the shoot to catch moiré early.
- Adjust distance or angle: Take a step forward or back, or shift your shooting angle to break up the moiré pattern.
- Change aperture or focal length: A wider aperture can soften problematic textures, while a slight zoom or reframing can disrupt alignment with the sensor grid.
- Test before the shoot: Take a few trial shots when working with fine fabrics or architectural patterns, and make necessary adjustments on set.
Fixing moiré:
- Use Lightroom’s moiré brush: Apply targeted moiré reduction on affected areas, fine-tuning Sharpness and Defringe as needed.
- Use AI Tools: Use software like Retouch4me, Luminar Neo, Topaz Photo AI, or ON1 Photo RAW to automate moiré removal while preserving texture.
Conclusion
Moiré is not a mistake. It is a limitation of how digital cameras record fine, repeating detail. The photographers who handle it best are not the ones who eliminate it perfectly, but the ones who recognise it early and choose the smallest possible compromise.
Preventing moiré is rarely about finding a flawless solution. It is about understanding the trade-offs between sharpness, texture, and framing, then intervening only as much as necessary. Sometimes that means changing distance. Sometimes it means adjusting aperture or framing. And sometimes it means accepting a controlled loss in post-production.
When you approach moiré this way, it stops being an unpredictable problem. It becomes another decision you know how to make, guided by intent rather than habit.
FAQ
Moiré is a visual interference pattern that appears when fine, repeating textures interact with the camera sensor, producing wavy lines, color shifts, or rainbow-like bands that don’t exist in the actual subject. It’s a common issue when photographing fabrics, digital screens, or tightly spaced architectural patterns.
Moiré is caused by a mismatch between the fine pattern in the subject and the fixed grid of pixels on a camera sensor. When the subject’s pattern exceeds the sensor’s sampling frequency, the sensor can’t accurately record it, creating interference that appears as swirling lines or false colors.
The best way to avoid moiré is through careful shooting. Adjusting your distance or angle, using a wider aperture, or reframing can disrupt the moiré pattern before it appears. Cameras with anti-aliasing (AA) filters can also help by slightly softening ultra-fine details. Taking test shots and zooming in on your preview screen during the shoot is one of the most reliable ways to catch and prevent moiré early.
You can fix moiré with photo editing software. Lightroom’s Adjustment Brush lets you selectively paint over affected areas and reduce the effect, while AI-powered tools like Retouch4me Fabric or Luminar Neo can automatically detect and correct patterns across larger areas.
Moiré is more likely to appear on subjects with fine, repetitive patterns that exceed the camera sensor’s sampling frequency. Fabrics like suits, mesh, or tightly woven textiles, as well as architectural elements like window grids or bricks, often create ideal conditions for moiré.
Ideally, prevention is best. Adjusting your shooting angle, changing aperture, or using a lens with slightly less resolving power can help suppress moiré at the source. Post-processing tools like Lightroom or AI retouching software are effective for cleanup but may soften detail if overused.