Part of our Workflow guides
Explore more articles on working faster, managing volume, and delivering efficiently in our Workflows section.
One question I get from other photographers quite often is how I’m able to deliver photos so quickly during and after an event.
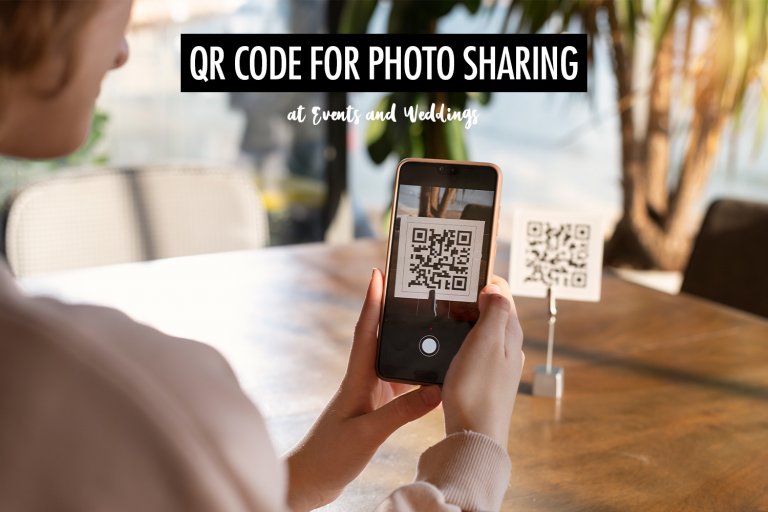
At many of the corporate events, conferences, weddings, and headshot booth activations I cover, photos are uploaded while the event is still happening. Guests can scan a QR code, find their photos, and start sharing them within minutes of the image being taken.
For the final edited gallery, my goal is to deliver it within three days.
This comes down to having the right photography workflow. Over the years, I’ve developed a process that reduces the time between capture and delivery by optimizing each stage of the workflow.
In this article, I’ll walk through the workflow I use, from capturing and sharing photos in real time during an event to culling and editing the final gallery afterward. If you want to shorten your turnaround times and deliver photos faster to clients and guests, this guide will show you how.
During the Event: Real-Time Photo Delivery
At many events today, photos are shared while the event is still happening through real-time photo delivery, where images appear in an online gallery within minutes of being taken.
This has become increasingly common at corporate events, conferences, weddings, brand activations, sports events, marathons, and headshot booths. When photos appear quickly, people are more likely to interact with them, and photography becomes part of the overall experience rather than something delivered afterward.
Guests: When someone receives their photo within minutes, they usually look at it right away, show their friends, and post it immediately. When galleries are delivered days later, most guests never even open the link.
Brands and event organisers: Instant delivery increases engagement during the event itself. Attendees share their photos on social media while they’re still at the venue, often tagging the brand or event. That visibility extends the reach of the event. It also allows marketing teams to publish photos while the event is still in progress.
Photographers: Real-time delivery means the work is seen while attention is still on the event. Instead of handing over a post-event gallery and hoping it gets shared, guests access the photos instantly. When people post images minutes after they’re taken, it often leads to new enquiries from other organisers or exhibitors.
To make this possible, the photography workflow during the event needs to be designed around speed. Let’s look at how each stage works.
Capture and Transfer
For real-time delivery to work, photos need to move from the camera to an online gallery as quickly as possible. That starts with how the images are captured and transferred during the event.
One of the first decisions is what file format to shoot. RAW files are useful for editing later, but they are large and slow to transfer. For real-time workflows, I shoot RAW + JPEG. The JPEG files are used for instant sharing during the event because they are much smaller and upload quickly, while the RAW files are kept for editing the final gallery afterward.
The next step is getting those photos off the camera as quickly as possible. In the past, I handled this manually by swapping SD cards with an assistant during the event. It was reliable, but it required constant coordination and slowed everything down.
Today, my photography workflow is much more automated.
In some situations, I use tethered shooting, where the camera is connected directly to a computer with a cable. Each photo appears on the computer immediately after it’s taken, allowing an assistant to review the images, upload them to a gallery, or send them to a slideshow or printer. I typically use this setup in controlled environments like headshot booths or photo ops.
For roaming coverage, I prefer camera-to-cloud workflows. In this setup, photos are transferred from my camera to a mobile device, which uploads them to the cloud automatically while I continue shooting. As long as the connection is stable, images can start appearing in the online gallery within seconds.
Both approaches solve the same problem: reducing the time between capture and delivery. Once photos are leaving the camera quickly, the final step is making them available to guests while the event is still in progress.
Sharing Photos in Real Time
The most common way to do this is through an event photo sharing gallery that updates automatically as new photos are uploaded. Guests can access the gallery by scanning a QR code displayed around the venue, on signage, or on screens. As images appear in the gallery, people can view, download, and share their photos almost immediately.
This approach works especially well for large events where hundreds or thousands of photos may be taken. Instead of asking guests to scroll through the entire gallery to find themselves, some platforms use face recognition to help them locate their photos quickly. Guests upload a selfie, and the system shows only the images that contain them, which makes the experience much faster and easier.
Real-time delivery can also feed live slideshows at the venue. As photos are uploaded, they automatically appear on screens around the event space. Guests often enjoy spotting themselves on the display, and it draws attention to the photography in a way that post-event delivery doesn’t.
The same workflow can also power instant printing. Photos that are uploaded to the system can be sent to a printer on-site so guests receive a physical photo just minutes after it’s taken.
In my workflow, I use Honcho for event photo sharing. As photos upload from my camera, they automatically appear in the online gallery and can power all of the features mentioned above.
After the Event: Delivering the Edited Photos
Once the event ends, my goal is to deliver the final gallery as quickly as possible.
For most events, my target is to deliver the gallery within three days. For marathons and races, the turnaround time needs to be even faster. If photos are going to generate sales, they usually need to be available within 24 hours, while participants are still excited about the race.
At this stage, I’m focused on turning the full set of images into a clean, well-edited gallery that’s ready to deliver to the client. That involves backing up the files, selecting the best photos, editing them in batches, and preparing the final gallery for viewing and download.
Backup
Before I start culling or editing, the first thing I do is make sure the photos are properly backed up.
Backup is one of those things photographers don’t think about seriously until something goes wrong. Over the years, I’ve had a laptop fail and a couple of hard drives die. Each time, I didn’t lose any photos because I already had multiple copies of the files in place.
For event and wedding photographers especially, losing images isn’t something you can recover from. There’s no way to recreate the moment once it’s gone.
The basic idea behind most backup systems is often referred to as the 3-2-1 rule:
- 3 copies of your data
- 2 different types of storage
- 1 copy stored off-site
In my own photography workflow, I create a second local copy of the photos as soon as I’m back at my workstation. My laptop is backed up to a NAS, and both my laptop and the NAS are backed up to the cloud. This gives me redundancy locally and protection against worst-case scenarios like theft or hardware failure.
The key is to assume failures will happen and design your system so one problem can’t wipe out everything at once.
Culling and Editing
Once the photos are backed up, the next step is turning the full set of images into the final gallery. This stage involves selecting the best photos and applying consistent edits across the entire set.
There are three main ways to approach this, depending on how much time you have and how many jobs you’re handling.
The most traditional approach is to handle everything manually using tools like Photo Mechanic and Lightroom. Photo Mechanic is often used for fast culling, while Lightroom is used for editing and exporting the final images. This workflow gives you complete control over the selection and editing process, but it also means you’re responsible for every step yourself. When you’re juggling multiple events or working against tight delivery timelines, editing can quickly become the bottleneck.
One way I speed this up is by using AI photo editing tools. These tools can automatically apply exposure and color adjustments across large batches of images, which helps create a consistent look much faster than editing everything manually. In my experience, AI tools are competent at making technical adjustments like exposure and white balance, and they can be more consistent than human editors when applying those corrections across hundreds of photos.
Where AI still struggles is culling. Selecting the best images from an event isn’t just a technical decision. It requires judgement about which moment matters, which expression looks natural, and which frame tells the story best—many of the moments that typically appear in an event photography shot list. AI systems tend to rely on rules like sharpness, closed eyes, or grouping similar images together. But they don’t understand social context or the emotional weight of a moment.
The third option is to outsource the editing to a professional editor. I started doing this in 2019 when editing became the biggest bottleneck in my business. Instead of spending hours every night editing galleries, I could focus on shooting, marketing, and client work while the editing happened in parallel.
For my event and roaming photography work, outsourcing often makes the most sense because the edits are straightforward. Most of the work involves exposure, white balance, and consistency rather than detailed retouching or a specific artistic style. It also helps me maintain my turnaround time when multiple events happen in the same week.
Sharing the Final Gallery
Once the photos are culled and edited, the final step is delivering them to the client and the people who were part of the event.
The most professional way to do this is through an online gallery designed for photographers. A gallery gives your photos a proper viewing experience and makes it easy for clients and guests to browse, download, and share the images.
There are several ways photographers share photos online. Some people use cloud storage services like Google Photos, Dropbox, or iCloud. These tools work for basic sharing, but they’re not really designed for photo delivery. Guests often have to scroll through entire folders to find their photos, and presentation is usually quite limited.
Another option is to use client gallery platforms like Pixieset or Pic-Time. These platforms provide a better viewing experience and more control over downloads, which makes them popular for delivering finished galleries to clients.
Personally, I prefer to use Honcho because it fits the workflow I described earlier in this article. The same gallery that guests access during the event can also be used for post-event delivery. Guests can revisit the gallery later, download their photos, and easily find themselves using the face recognition feature instead of scrolling through hundreds of images.
For large events, conferences, weddings, and races, this makes a big difference. Guests don’t have to search through the entire gallery to locate their photos, and it saves the organiser or photographer from manually sending images to each person.
Conclusion
Fast photo delivery comes from designing the entire workflow so every stage moves efficiently from capture to delivery.
For me, that means capturing photos in a format that supports quick sharing, transferring images off the camera automatically, making them available to guests in real time, and then moving quickly through backup, culling, editing, and final delivery after the event.
When the workflow is set up this way, delivering photos during an event and turning around the final gallery within a few days becomes much more manageable.
The exact tools you use will depend on the type of photography you do, the volume of images you handle, and the expectations of your clients. But the principle remains the same: the less friction there is between each stage of the workflow, the faster you can deliver photos without sacrificing quality.
If you’re looking to shorten your turnaround times, start by looking at your photography workflow as a whole. Small improvements at each step can add up to a significant difference in how quickly you can deliver photos to your clients and guests.