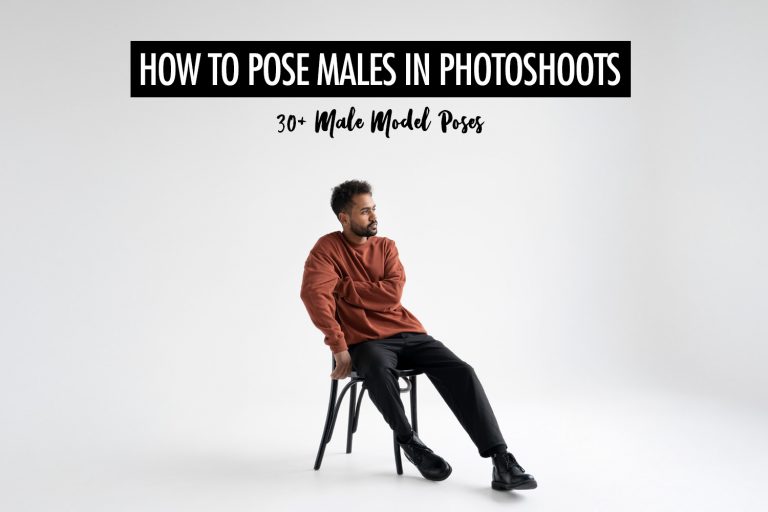
Part of our Creativity guides
Explore more ideas, inspiration, and visual techniques in our Creativity section.
I’ve spent years working in studio environments, shooting portraits and commercial work where lighting choices are never neutral. In agency-led projects especially, lighting is chosen deliberately to shape mood, story, and how a subject is perceived.
Rembrandt lighting is not something I use by default or treat as a safe setup. I reach for it when a brief calls for depth or a more introspective tone. I’ve used it in commercial shoots for editorial-style campaigns, lifestyle brand storytelling, and concept-driven portrait work where the goal was not to look friendly or generic, but thoughtful and intentional.
One example was an editorial feature of a high-achieving entrepreneur for a long-form magazine profile. The brief was to show him as reflective and self-aware after years of building and scaling, rather than bold or outwardly daring. Rembrandt lighting was chosen to support that mood.
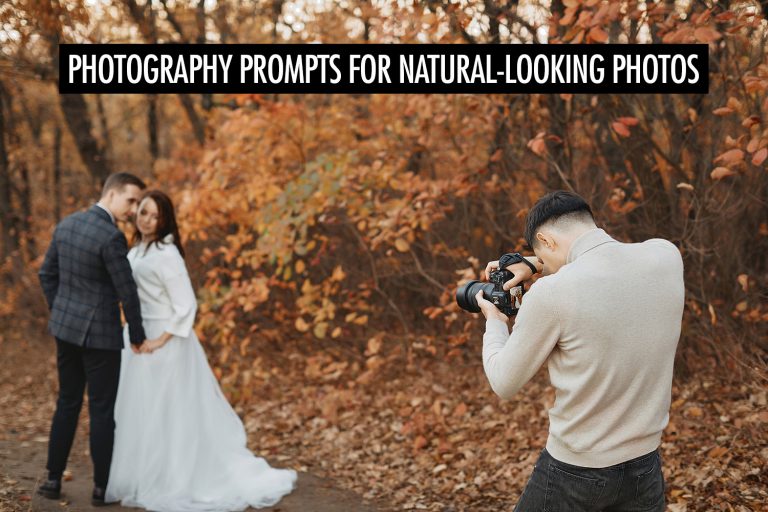
The goal of this article is simple. I want to explain what Rembrandt lighting is, why it works, and how to set it up reliably in a studio or with natural light. Once you understand the logic behind it, the setup becomes easy to repeat across different subjects and briefs.
What is Rembrandt Lighting?
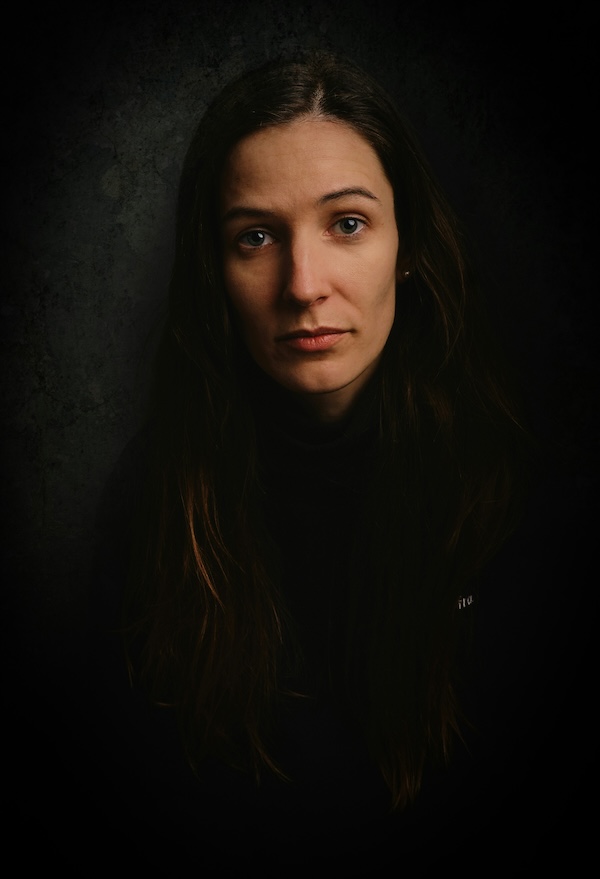
Rembrandt lighting is a portrait lighting pattern used when you want depth. It uses shadow to shape the face, while keeping enough light on the subject to maintain some level of detail.
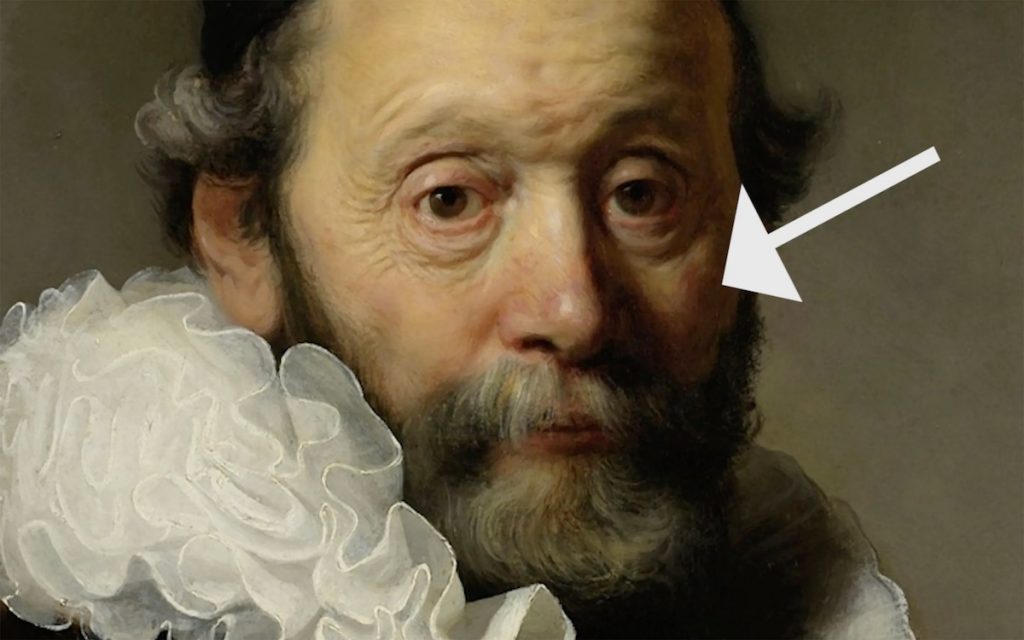
The most recognisable feature is the small triangle of light on the cheek opposite the main light, just below the eye. This triangle is a visual cue that the key light is placed far enough to create shape, but not so far that the opposite side of the face falls into deep shadow.
What makes Rembrandt lighting effective is balance. One side of the face is clearly lit, while the other falls away slightly. The shadow cast across one side of the face helps to define cheekbones, jawlines, and other facial features. The trade-off is approachability. Compared to flatter lighting, Rembrandt lighting feels quieter, more serious, and less immediately warm.
One practical advantage that’s often overlooked is how well Rembrandt lighting handles facial asymmetry. Most faces are not perfectly symmetrical, and flat lighting tends to reveal those differences clearly. By placing one side of the face in shadow, Rembrandt lighting simplifies what the viewer notices first, allowing the stronger side to lead and reducing attention on minor imbalances. It also works well for subjects with rounder faces or softer features, where added structure helps the face read with more definition.
In the end, choosing Rembrandt lighting is a mood decision. It communicates restraint, seriousness, and introspection. That makes it a poor fit for work that needs to feel open or friendly, such as traditional corporate portraits, beauty-focused shoots, or high-volume commercial work. When warmth is the priority, other lighting patterns work better. When character and intention matter more, Rembrandt lighting is a strong choice.
History of Rembrandt Lighting
Rembrandt lighting takes its name from the Dutch painter Rembrandt van Rijn, and its origins come from working within constraints.
Rembrandt often worked with a single, fixed light source, usually a window. Instead of trying to light faces evenly, he composed his portraits around shadow. Light fell off naturally across the face, creating form and depth.
That same idea later carried into photography. When photographers adopted this lighting pattern, they were using a practical solution to a common problem: how to create depth and seriousness with a simple lighting setup.
The logic did not stop with photography. Cinematographers have used the same pattern for decades in film noir, dramatic interviews, and character-driven scenes. Directional light shapes the face. Shadow adds tension. Together, they suggest inner life without needing elaborate setups.
Rembrandt lighting has lasted because it works in many situations. It only needs one light, it’s easy to control, and the results feel intentional rather than decorative. Today, those same qualities make it useful for editorial portraits, brand storytelling, and concept-driven work where mood is a deliberate choice.
How to Create Rembrandt Lighting in the Studio
Rembrandt lighting looks dramatic, but the setup itself is simple. You just need to be precise with your angles. Start at 45 degrees, then refine.
That simplicity is also why it adapts well to smaller spaces, similar to the constraints I work within when setting up a headshot booth.
Start With the 45-Degree Angle
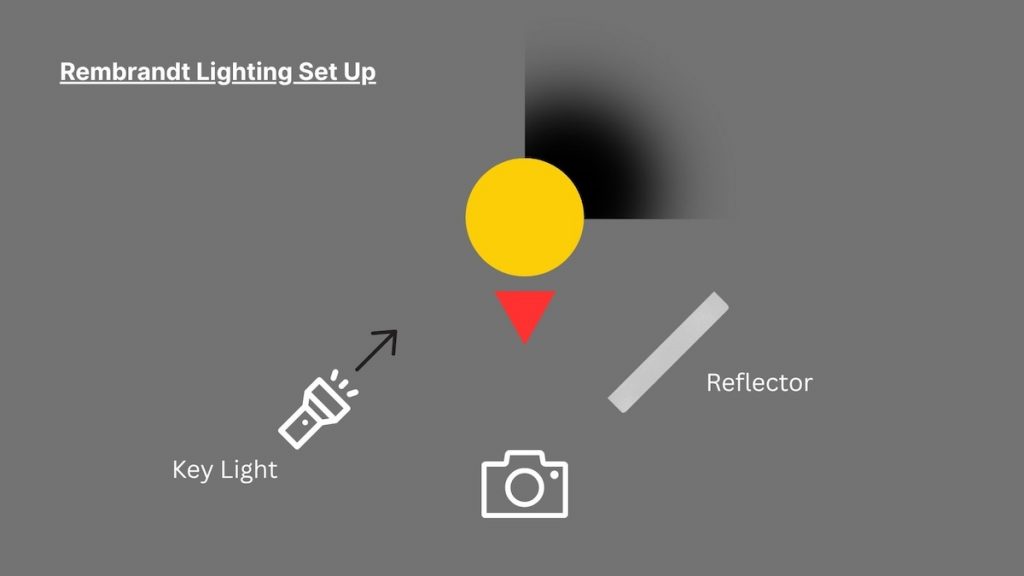
Place your key light about 45 degrees to the side of your subject and slightly above eye level. That’s your baseline.
From there, watch the shadows.
You’re looking for the nose shadow to connect with the cheek shadow, forming a small triangle of light on the far cheek. That triangle tells you the angles are correct.
45 degrees is just a starting point because every face is different.
Some people have flatter noses or stronger cheekbones, and that changes how the shadow falls. That means you will almost always need to make small adjustments. Higher cheekbones usually create a smaller, sharper triangle. Softer or lower cheekbones can produce a wider patch of light. A flatter nose usually means I have to move the light slightly farther to the side so the nose shadow connects with the cheek shadow.
You can adjust either the light or the subject. Sometimes it’s easier to ask the subject to turn their head slightly than to move the light stand. Tiny movements make a big difference.
This is not a “set it once and it works for everyone” setup. If you’re photographing multiple people in the same session, you will need to tweak the angle for each one.
While you’re adjusting, don’t forget the eyes. If the eyes are dead, the portrait feels lifeless, so make sure you have a catchlight in the eyes. If you don’t see one, adjust the height or angle of your light.
Once the triangle is well defined, I decide how much contrast I want. I usually end up somewhere around a 4:1 lighting ratio, sometimes even 8:1 if I want more depth. That means the highlight side of the face is clearly brighter than the shadow side.
If the shadow side feels too dark, I’ll add a reflector or a very subtle fill light. The key word is subtle. Too much fill erases the triangle and flattens the face. The goal is to soften the transition and lift the shadows slightly.
How to Fix Common Mistakes
If one side of the face is completely dark with no triangle at all, that’s split lighting. Your light is too far to the side. Move it slightly closer to the centre.
If the light is spilling across the far cheek and the triangle disappears or opens up too much, that’s broad lighting. Your light is too central. Move it further to the side.
You’re constantly balancing between those two extremes.
Usually the fix is small. A few inches left or right can completely change the pattern.
Because the angles matter so much, you can’t let the subject move freely once you’ve dialed it in. If they turn too much, the triangle disappears. If they lean forward or backward, the shadow changes.
This controlled stillness actually suits the introspective mood Rembrandt lighting creates. It naturally works better for composed, deliberate portraits than for energetic or movement-heavy shots.
Choosing Hard Light or Soft Light
The quality of the light changes the feel of the image.
A large softbox placed close to the subject gives you softer shadows. The triangle will still be there, but the edges will be smoother and more subtle. This is usually more forgiving and works well for most faces.
A smaller modifier, like a beauty dish or harder light source, creates sharper shadows. The triangle becomes more defined and the facial structure looks more pronounced.
People often say hard light works better for men because it looks more chiselled. I don’t really agree with that blanket rule. Hard light works best when the subject already has sharp features, regardless of gender. On rounder faces or softer features, soft light is more flattering.
Light softness depends on two things:
- The size of your modifier
- The distance from the subject
Bigger and closer equals softer. Smaller and further away equals harder.
It’s a stylistic decision. There isn’t a correct answer, only what fits the brief and the face in front of you.
Controlling the Background
Rembrandt lighting works naturally with a darker background because it reinforces the moody feel you’re trying to create.
But you don’t need a black backdrop.
If you’re using a white background, just move your subject further away from it. Light falls off quickly. The further the background is from the subject, the darker it will appear. That’s just the inverse square law doing the work for you. For a deeper look at working with white backgrounds, check out my guide on white background portraits.
If you’re in a tight space and can’t create distance, switch to a darker backdrop or use grids on your light to stop it from spilling onto the backdrop.
The more you control where the light goes, the more selective the image becomes.
You can even light just the face, neck, and shoulders, letting the rest of the body fall into shadow. That selective lighting strengthens the mood and keeps attention exactly where you want it.
Example Studio Settings
If you’re working in a controlled studio environment with strobes, here’s a practical baseline to get you close:
- ISO 100
- Shutter speed: 1/125s (or your camera’s sync speed)
- Aperture: f/8
- One key light at roughly 45 degrees
- Optional fill light 1–2 stops lower than the key
At f/8, you get enough depth of field to keep both eyes sharp, even if the face is turned at an angle. The key light should do most of the shaping. If you introduce fill, keep it subtle. Once the fill approaches the same intensity as the key, the triangle starts to disappear and it turns into flat lighting.
Think of these settings as a starting point to get you close, not a formula.
How to Create Rembrandt Lighting with Window Light
You don’t need strobes to create Rembrandt lighting. In fact, this pattern originally comes from window light. The setup logic is exactly the same. The only difference is that the light source stays fixed, and your subject does the moving.
Choose the Right Window
Look for a window that gives you soft, directional light.
North-facing windows are ideal because they provide consistent light without direct sun. If sunlight is streaming in harshly, diffuse it with a sheer curtain or a white sheet. You’re trying to create a large, soft light source, similar to a softbox.
The bigger the window relative to your subject, the softer the shadows will be.
Position the Subject at an Angle
Place your subject about 1–2 feet from the window, then rotate them about 45 degrees towards the light.
Just like in the studio, you’re looking for the nose shadow to connect with the cheek shadow. That triangle is your guide.
If you don’t see a triangle, rotate the subject or move them slightly closer or further from the light. Small adjustments matter.
Control Spill and Reflections
Window light is less controlled than a strobe, so watch for light bouncing off white walls, floors, or ceilings.
If you want stronger contrast, move away from reflective surfaces.
If the shadow side is too dark, place a white foam board or reflector opposite the window to lift it gently.
Time of Day Matters
Soft morning and late afternoon light is easiest to work with.
Midday light can still work, but it’s harsher and creates stronger contrast. You’ll need diffusion or greater distance from the window to soften it.
Cloudy days are excellent. Overcast skies turn the entire window into a giant softbox.
Rembrandt Lighting vs Other Popular Lighting Techniques
Rembrandt lighting is not better or worse than other lighting patterns. It simply communicates something different, and understanding that difference helps you choose deliberately.
It’s also important to understand where it breaks down.
Rembrandt lighting struggles when the facial structure doesn’t give you enough geometry to work with. On very flat facial features, the triangle can become vague. Instead of looking intentional, it can look like a lighting mistake.
It can also be tricky with deep-set eyes. Because the key light is positioned above eye level, heavy brow structure can push the eyes into shadow. If you’re not careful, you lose detail and the portrait starts to feel too heavy.
Glasses introduce another complication. The angle that creates the triangle can easily introduce glare or reflections, which you then have to remove in post. That said, modern AI retouching tools make that process far easier than it used to be.
It’s also a poor fit for most commercial work. If the brief calls for brightness, openness, and broad appeal, Rembrandt lighting works against that. The shadow that gives it depth can feel too serious for beauty campaigns, corporate brochures, or energetic branding.
Finally, it doesn’t pair well with movement-heavy shoots. Because the triangle relies on precise angles, even small head turns can change it into loop or split lighting. Rembrandt lighting rewards stillness. If the subject needs to move freely, another pattern may be more practical.
Loop Lighting

Loop lighting is softer and more open. The nose shadow falls to the side but does not connect with the cheek shadow, so the far side of the face stays brighter.
If Rembrandt introduces tension, loop lighting reduces it.
Loop lighting works well for:
- Professional headshots
- Personal branding
- Corporate portraits
- Situations where warmth and approachability matter
If you want depth without losing friendliness, loop lighting is often the safer choice.
Rembrandt becomes useful when you want more weight and seriousness.
Split Lighting

Split lighting places the light directly to the side, lighting only half the face.
It’s more aggressive than Rembrandt. There is no triangle, just a hard divide.
Split lighting works well for:
- Athletic portraits
- Gritty character work
- Highly stylised imagery
Rembrandt is more restrained. It still introduces shadow, but the small triangle of light preserves some detail.
Butterfly Lighting
Butterfly lighting places the light directly in front of the subject and slightly above eye level, creating a small shadow under the nose and even illumination across the face.
Because the light is symmetrical, it emphasises cheekbones and jawlines, which works best when those features are already strong and well defined on the subject.
Butterfly lighting is commonly used for:
- Beauty and cosmetics campaigns
- Fashion portraits
- Commercial headshots where clean presentation matters
If the goal is clean, commercial beauty, butterfly lighting is usually the stronger choice. If the goal is narrative, mood, or character, Rembrandt adds more dimensional weight.
Conclusion
Rembrandt lighting has endured for a reason. It gives you shape, depth, and mood with a single light and a clear intention.
Once you understand that the triangle is simply a sign that your angles are correct, the setup becomes less mysterious. Place the light, watch the shadows, adjust for the face in front of you. Small movements matter. Every subject is different. When the nose shadow connects with the cheek and the balance feels right, you’re there.
It is not the right choice for every shoot. If the brief calls for warmth or openness, other lighting techniques will serve you better. But when you want a sense of weight in the portrait, Rembrandt lighting is one of the most relevant techniques you can use.
Frequently Asked Questions
Rembrandt lighting is a portrait lighting pattern where the key light is placed to the side and slightly above the subject, creating a small triangle of light on the cheek opposite the light source. It adds depth by shaping the face with shadow while keeping enough detail to preserve structure and expression.
It is named after the Dutch painter Rembrandt van Rijn, who often used a single window light to shape faces with shadow. His portraits frequently showed the same small triangle of light on the shadowed cheek, and photographers later adopted the term to describe this lighting pattern.
It can be, depending on the goal. Rembrandt lighting adds structure and seriousness, which works well for editorial headshots, actor portraits, or branding that aims to feel thoughtful and intentional. For corporate or high-key headshots that need warmth and openness, loop or butterfly lighting is usually a better choice.
Place your key light about 45 degrees to the side of the subject and slightly above eye level. Adjust the angle until the shadow from the nose connects with the shadow on the cheek, forming a small triangle of light under the eye on the shadowed side. Small adjustments to either the light or the subject’s head position usually make the difference.
Both use side lighting, but in loop lighting the nose shadow does not connect with the cheek shadow, so the far side of the face stays brighter. In Rembrandt lighting, the shadows connect to form the triangle, creating more depth and a slightly more serious, dramatic look.
It can, but the angle that creates the triangle can also introduce glare or reflections on lenses. Slightly raising or lowering the light, adjusting the subject’s head tilt, or angling the glasses can reduce reflections. Modern AI retouching tools also make glare removal much easier than it used to be.