Part of our Creativity guides
Explore more ideas, inspiration, and visual techniques in our Creativity section.
I’ve been shooting white background portraits for years, both on location and in studio environments, for corporate headshots, commercial campaigns, and editorial work. From makeshift setups in office meeting rooms to controlled studio shoots with demanding clients, I’ve learned that getting a clean white background consistently has far less to do with expensive gear and far more to do with understanding exposure, distance, and lighting ratios.
White backgrounds look simple, but they’re deceptively easy to get wrong. Grey instead of white. Blown highlights on skin. Light spilling onto the subject and killing contrast. These are issues I see all the time, especially when photographers follow generic advice without understanding why they work.
This article is written to show you how to shoot strong white background portraits as simply and reliably as possible. I’ll walk through the setups I actually use, explain what matters most and what doesn’t, and highlight the common mistakes that cause white backgrounds to fail in real-world shoots. The goal is consistency, speed, and results you can repeat whether you’re shooting a single headshot or an entire team.
If you want to know how to achieve clean white backgrounds without overcomplicating your lighting or relying on heavy post-processing, this guide will give you a practical foundation you can use immediately.
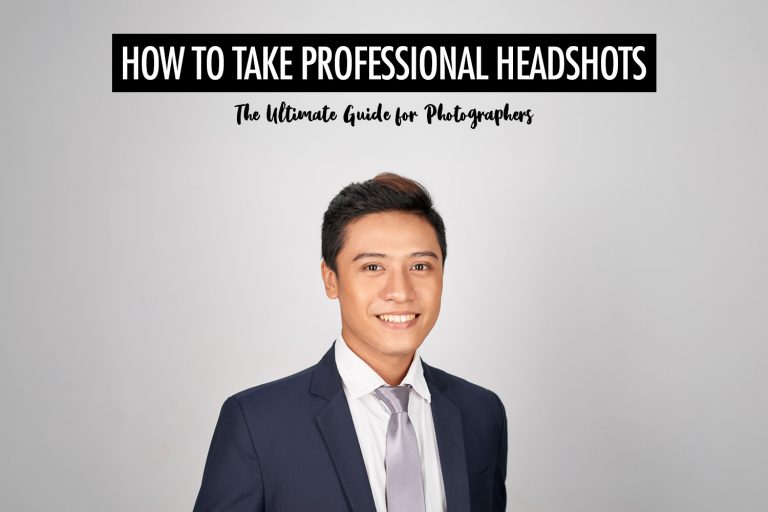
Why White Background Portraits?

In my experience, white background portraits are almost always driven by practical client needs. Clients want images that are consistent, flexible, and easy to reuse across different platforms and over time.
That also means making deliberate decisions early on, such as choosing portrait orientation over landscape, since most white background portraits are designed to work as headshots, profile images, and vertically framed layouts rather than wide scenes. If you’re weighing that decision, we break down the differences in our guide to portrait vs landscape orientation.
A common scenario I run into is companies hiring me to shoot staff portraits across multiple locations. I’ve worked with clients who needed headshots taken months apart, in different offices, sometimes even in different countries. Lighting conditions, wall colours, and room sizes changed every time. If we had relied on environmental or grey backgrounds, the differences would have been obvious.
Using a controlled white background solved that immediately. Every subject was lit and framed the same way, regardless of location or timing. When the images went live on the company’s website, there was no visual clue they were shot across separate sessions. From the client’s perspective, that consistency was the real value.

I see the same logic when working with agencies. The portraits aren’t meant to live in one fixed layout. They get reused across websites, paid ads, pitch decks, social posts, and printed materials. A white background lets designers drop images into different contexts without fighting background colours, textures, or uneven tones. In that sense, white is a design system decision.
White backgrounds also age well. They keep attention on the subject, integrate cleanly with branding and UI elements, and avoid visual trends that date quickly. For clients, that reduces risk and future rework.
White background portraits aren’t exciting, but they scale cleanly, simplify production, and hold up across time. When done properly, they solve real operational problems, which is why clients keep asking for them.
How to Light a White Background Properly
If there’s one thing I’ve learned from shooting white background portraits in both studios and on-site offices, it’s this: you simply cannot get a clean, usable white background with a single light source.
If you expose the subject correctly with one light, the background will almost always fall to grey. It’s just physics. Because of the inverse square law, light intensity drops rapidly with distance. Your subject, being closer to the light, will always receive more exposure than the background behind them.
There is one caveat. You can technically get a white background with a single light by placing the subject very close to the backdrop. In that setup, the background goes white because it’s receiving nearly the same light as the subject.
The trade-off is that the subject will cast a visible shadow onto the background, and you lose any real control over separation. For headshots this often looks amateur, and for commercial work it’s usually unacceptable (unless it’s a deliberate stylistic choice). The shadow becomes part of the background, not something you can cleanly remove.
That’s why, in practice, the only reliable way to achieve a clean white background without shadows or edge problems is to light the background separately from the subject.
The Ideal Setup: Two Background Lights
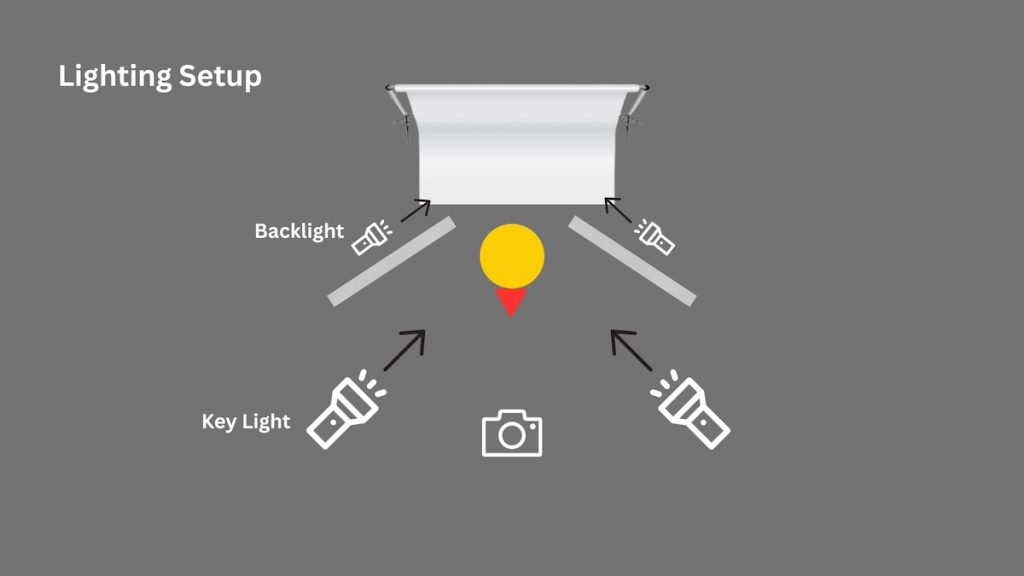
In a studio with enough space, the cleanest setup uses two dedicated background lights, placed on either side of the subject and aimed directly at the backdrop.
This does two things:
- It evenly illuminates the background from edge to edge
- It allows you to control background exposure independently from the subject
I typically set the background lights about one to two stops brighter than the subject exposure. Bright enough to clip to white, but not so bright that light starts spilling forward.
To control spill, I use V-flats or flags placed between the subject and the backdrop. Their job is to block reflected light from bouncing off the white background and wrapping around the subject’s edges. If you skip this step, you’ll get glowing outlines and soft, fuzzy edges around the hair and body. Once that happens, it’s almost impossible to fix cleanly in post.
This setup works beautifully, but it assumes you have space. Many real-world shoots don’t.
The On-Site Reality: One Background Light
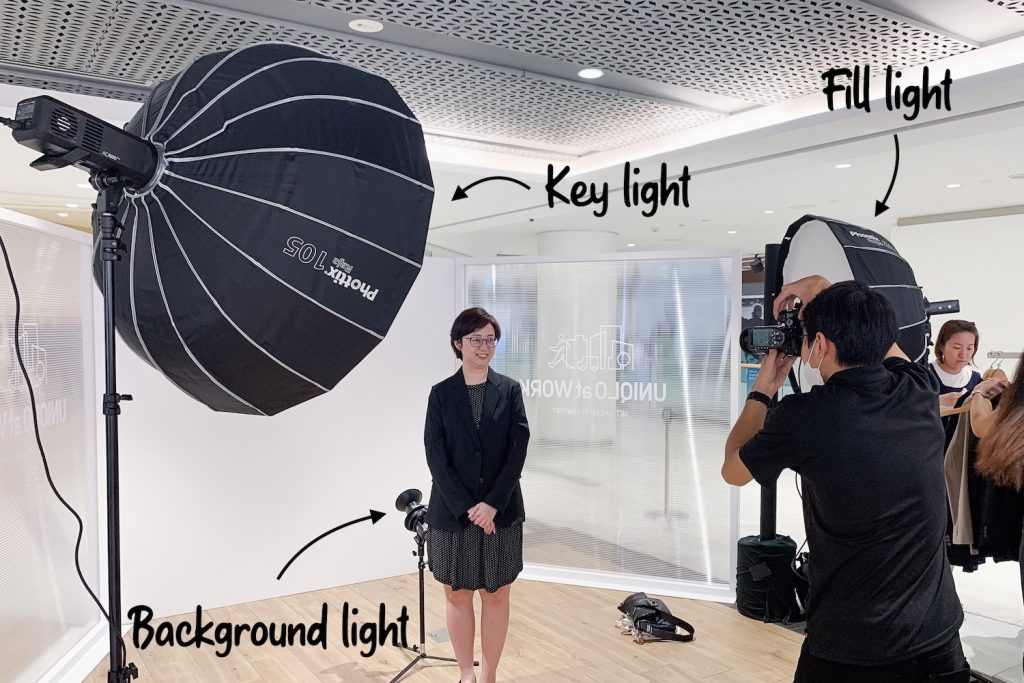
When shooting in offices, conference rooms, or temporary setups at public roadshows, I often don’t have the space needed for two background lights and proper flags. In those situations, I simplify the headshot booth setup to fit the constraints.
For waist-up portraits, I’ll usually work with a single background light placed low, roughly at knee height, directly behind the subject and angled slightly upward toward the backdrop. As long as the light stays hidden behind the subject and evenly illuminates the area around their head and shoulders, the background will read as white where it actually matters.
Anything outside that zone can be easily dodged to white later, as long as it doesn’t overlap with the subject.
Full-body shots are more challenging. A single background light placed to one side will almost always light the backdrop unevenly, with one side bright and the other falling off. At that point, you just have to decide which compromise makes the most sense for the job.
I cover the setup for mobile headshot booths in more detail in this article.
Why White Background Portraits Fail in Real Shoots

The biggest enemy in white background portraits is light spill.
When the subject is too close to the backdrop, two problems appear at once. First, reflected light from the background wraps back onto the subject, reducing contrast and creating fuzzy edges, especially around hair and shoulders. Second, the subject starts casting shadows onto the backdrop, which forces you to push the background exposure even harder to compensate.
Both issues compound each other.
Creating distance is the simplest fix. Even an extra half meter between the subject and the backdrop makes a visible difference. It reduces the shadow, limits spill, and gives you cleaner separation.
If you can’t create that distance, you’re often better off not forcing pure white in-camera.
In tight spaces, I’ll sometimes let the background fall to a light grey and finish it in post. Modern masking tools are very good at separating crisp edges when the subject lighting is controlled. What they can’t fix is blown-out edges caused by spill.
It’s a choose-your-poison situation. A slightly grey background is fixable. Fuzzy edges are not.
Choosing the Right White Backdrop
The backdrop you choose has a bigger impact on how easy or painful the shoot becomes than the actual final result. In theory, many materials can look white. In practice, some make your life much easier, especially when you’re working fast or on location.
Cyc Wall (If You Can Afford It)
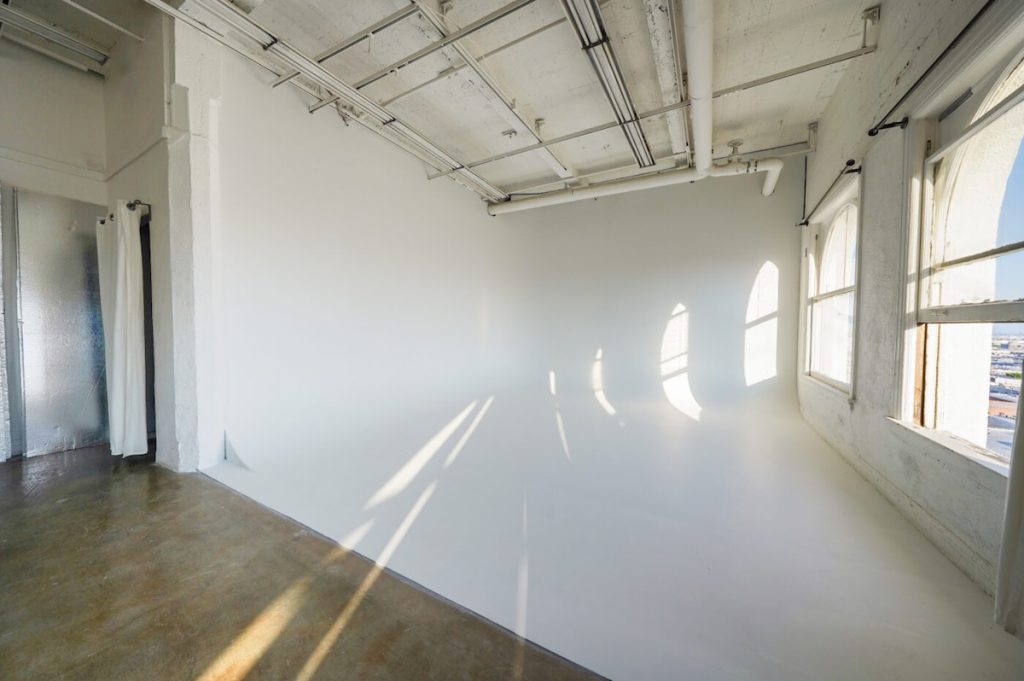
If you have access to a studio with a cyclorama wall, use it. It’s by far the easiest way to achieve a clean white background, especially for full-body or commercial work.
A cyc removes corners, seams, and floor transitions entirely, which means fewer shadows and less post-production. You also get more working distance, which helps with spill control and subject separation. For campaigns, fashion, or anything involving movement, a cyc is the most forgiving option.
The downside is cost and availability. It’s not always practical for smaller jobs or on-site shoots, but when consistency and speed matter, it’s hard to beat.
Seamless White Paper (My Go-To for Most Jobs)
For portable setups, white seamless paper is what I rely on most. It gives you a clean, uniform surface, minimal texture, and far fewer headaches than fabric.
Paper backdrops crease less than cloth as long as you treat them properly. I’ve transported rolls to offices and temporary setups countless times, and as long as they’re protected and unrolled carefully, they stay clean and flat. Small scuffs can be cut off or rolled past, which is another advantage over fabric.
If you’re aiming for pure white, paper is very forgiving. Even minor imperfections disappear once the background is lit correctly. This makes it ideal for corporate headshots, commercial portraits, and repeatable setups.
Fabric Backdrops (Use With Caution)
Fabric backdrops can work, but they require more preparation. They crease easily, and those creases become a real problem if you’re not blowing the background out to pure white.
If your goal is a high-key white background, small wrinkles usually disappear once the background is overexposed. But if you’re intentionally letting the background sit at light grey, every crease becomes visible and tedious to clean up in post.
Fabric is fine when budget or portability is the priority, but it’s rarely my first choice unless I know I have time to prep it properly.
Foam Board, Cardboard, and V-Flats

Foam boards and V-flats are best thought of as support tools rather than primary backdrops.
They’re excellent for tight headshots, especially on location, and they double as reflectors or flags. I’ll often use them to extend a white area behind the subject or to control spill, not to cover an entire background.
They work well when you only need a clean white zone behind the subject’s head and shoulders, but they’re not practical for full-body portraits or larger compositions.
White Walls (Situational)
A clean white wall can work, but it’s the least predictable option. Wall texture and reflections vary from location to location.
In offices, walls often look clean to the eye, only for scuffs and marks to reveal themselves during post-processing, adding extra retouching work. I’ll use a wall if I have no other option, but I’m mentally prepared to spend more time cleaning it up.
The Practical Takeaway
If your priority is consistency and speed, a cyc or white seamless paper will save you time and stress. Fabric and improvised solutions can work, but they increase your reliance on post-production and reduce repeatability.
In commercial and corporate work, clients don’t care what backdrop you use. They care that the images look consistent across shoots, locations, and time. Choosing the right backdrop upfront is one of the easiest ways to deliver that consistency without fighting your setup every time.
Additional Considerations

Once the lighting and subject-to-background distance are set, a few additional decisions determine how clean, consistent, and efficient the shoot will be. These won’t fix a poor setup, but they do affect reliability and workflow.
Choose Aperture Based on the Job, Not the Light
With studio lighting, aperture is no longer a technical constraint. You’re not chasing exposure, so depth of field becomes a stylistic choice.
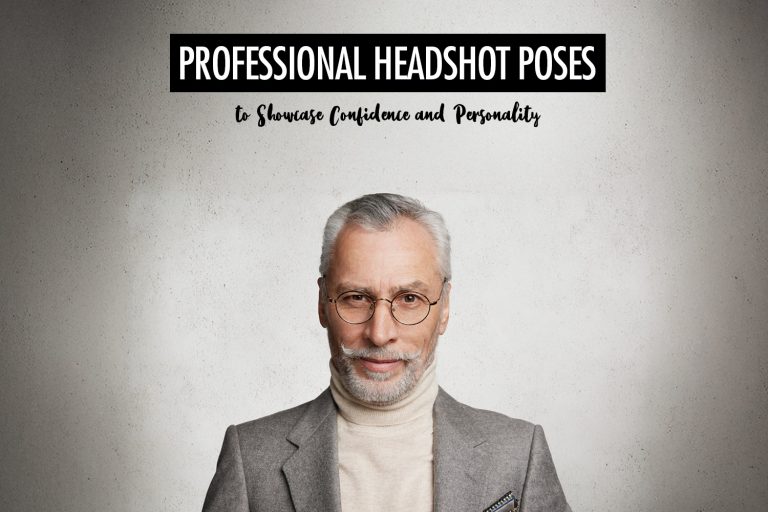
For editorial or styled portraits, I’ll often open up the aperture to introduce separation and mood. This works well when you’re shooting slowly and intentionally, especially for looks where only the eyes are tack sharp. If you want different headshot poses to experiment with in these situations, we’ve put together a practical guide on professional headshot poses.
For most commercial and corporate headshot work, I do the opposite. Shooting at f/8 or smaller gives you margin for error. Small movements, posture shifts, or minor focus inconsistencies won’t cost you usable frames. In high-volume sessions, consistency and sharpness matter far more than shallow depth of field.
Expose for Skin, Always
On white background shoots, the most common mistake I see is photographers pushing exposure to force the background white. The result looks fine on the camera screen, but the skin is already clipped.
I’ve had corporate clients request small retouching changes weeks later. When the highlights are gone, there’s nowhere to go. You can’t recover skin texture that never made it into the file.
In practice, I always expose for the face first, even if that means the background comes out light grey. A clean grey background can be pushed to white in seconds. Blown skin cannot be fixed at all.
Lock White Balance for Faster Post-Processing
On white background shoots, I always use a fixed white balance.
When delivering large batches of portraits, consistency saves hours. Locking white balance ensures every file responds the same way in post. Even if the colour needs correction, it can be adjusted once across the entire set instead of image by image.
This is less about colour accuracy in-camera and more about post-production efficiency and control.
Post-Processing White Background Portraits

Post-processing is part of the workflow for white background portraits. But it’s important to be clear about what it should be used for.
In my experience, post-processing should refine a good setup, not rescue a bad one.
When the lighting is controlled, the subject is separated from the background, and spill is kept in check, cleaning up a white background is trivial. When those fundamentals are wrong, no amount of editing will truly fix the image.
Where Post-Processing Works Well
Post-processing, whether manual or AI-assisted, works best when:
- The subject is properly exposed and well-lit
- Edges around hair and shoulders are clean
- The background is evenly light grey or near-white
In these cases, the work is straightforward. A quick curves adjustment, background dodge, or subject mask is often enough to push the background to pure white. AI tools can speed this up further, especially when delivering large batches of images, by applying consistent adjustments across the entire set. If you’re exploring this route, our guide to AI photo editors for photographers goes deeper into which tools are actually useful in real workflows.
This is what AI does best: saving time on repetitive, low-risk corrections.
Where Post-Processing Breaks Down
Post-processing fails when it’s asked to fix lighting problems.
If light from the background wraps around the subject, you lose edge contrast. Hair becomes translucent, shoulders glow, and fine details disappear. Once that information is gone, software has nothing reliable to work with.
AI background removal tools struggle most in exactly these situations. They guess. Sometimes the result looks acceptable at a glance, but the edges fall apart under scrutiny, especially for professional or commercial use.
Manual retouching doesn’t fare much better. You can spend hours masking, but you’ll never fully recover what wasn’t captured cleanly in-camera.
My Rule of Thumb
I treat post-processing as a multiplier, not a safety net.
If the lighting is solid, post-processing is fast and predictable. If the lighting is compromised, post-processing becomes slow, inconsistent, and risky.
That’s why I’d rather deliver a subject on a clean light grey background and push it to white later than force pure white in-camera and end up with fuzzy edges that can’t be fixed at all.
Use AI and manual tools to:
- Speed up clean work
- Standardise large batches
- Make small, controlled adjustments
Don’t rely on them to:
- Undo light spill
- Rebuild lost edge detail
- Rescue blown highlights
Good white background portraits are still won by lighting, distance, and control. Post-processing just helps you get to the finish line faster.
Common White Background Failures (And What They Actually Mean)
If a white background portrait feels off, it’s usually one of these issues. Each one points to a specific setup problem.
- Background looks light grey but skin is already blown
This happens when the balance between subject light and background light is wrong. The correct fix is to reduce subject light to protect skin detail, then increase background light independently until it clips cleanly to white. Blown skin cannot be recovered, but a slightly grey background is easy to correct in post. - Glow, halo, or fuzzy edges around hair and shoulders
Background light is spilling forward and wrapping onto the subject. This happens when the subject is too close to the backdrop or when flags aren’t controlling spill. Once edge contrast is lost, it cannot be cleanly recovered in post. - Uneven white from top to bottom
Background lighting isn’t even. Often caused by using a single background light for full-body shots. - Visible subject shadow on the backdrop
Not enough distance between subject and background.
If you can identify which failure you’re seeing, the fix becomes obvious.
Conclusion
Once you understand the fundamentals of white background portraits, the process becomes predictable. You don’t need expensive gear or heavy post-processing. You need control over lighting ratios, clear separation between subject and background, and enough distance to manage spill and shadows.
In real-world shoots, especially on location, reliability and repeatability are the goal, not perfection. Knowing when to simplify the setup, when to accept light grey and finish it cleanly in post, and when to stop pushing the background harder will save you time and headaches.
When approached as a logical process, white background portraits stop being frustrating and become one of the most efficient and client-friendly looks you can offer.
Get the lighting right, protect your edges, expose for the subject, and let everything else fall into place.